RMS User Guide - Starting a Submission
Creating a New Animal Use Protocol (AUP)
Creating a New Animal Use Protocol (AUP)
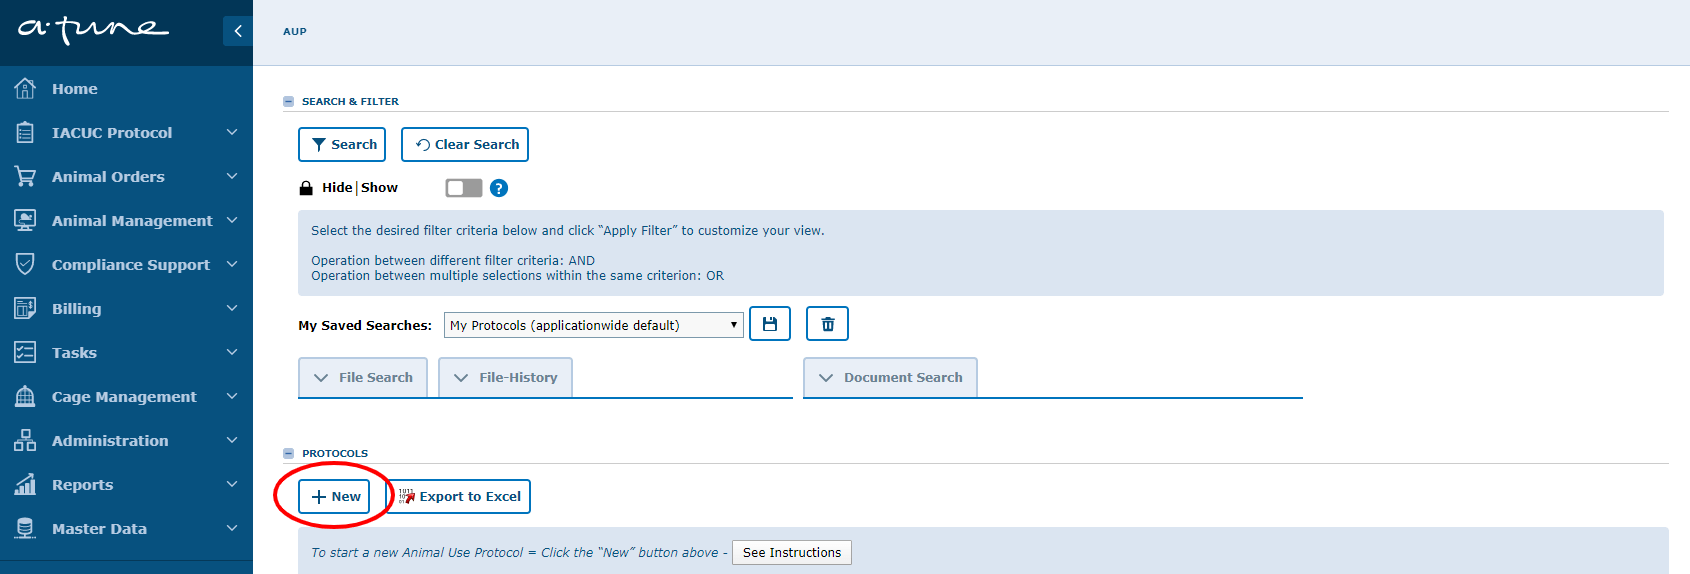
- Click the
 button to create a new AUP.
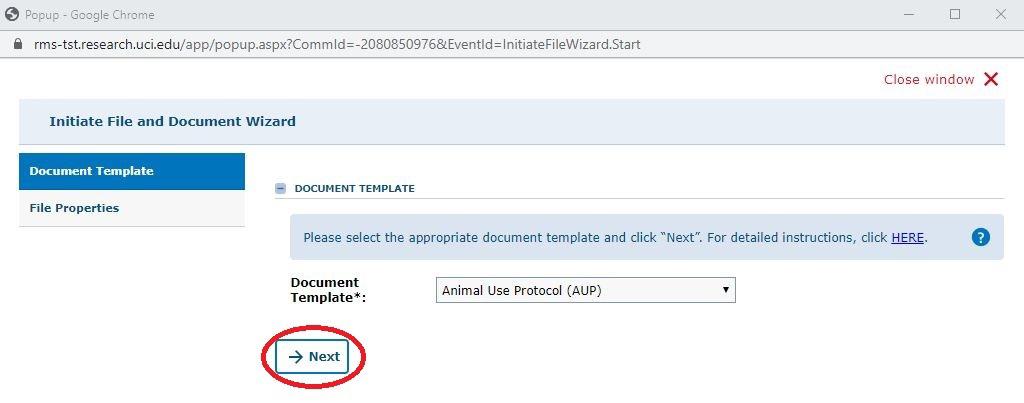
- A pop-up window for the Initiate File and Document Wizard will appear.
- Click the
 button to start the Wizard.
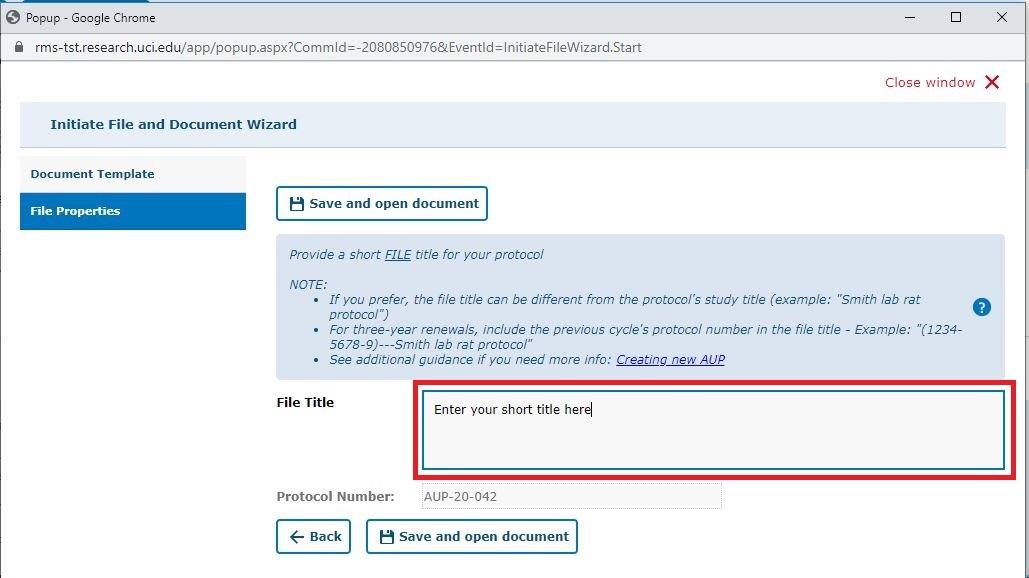
- The next screen will prompt for the “File Properties”.
- Enter a short title for the AUP in the text box.
NOTE: The “Title” on this page does not have to be the same full title of your protocol, which you will have a chance to enter on the next screen (General Information Tab). Choose something short, general and meaningful for your File name here.For 3-year renewals of an existing protocol, please reference the previous protocol number into the title of the file name.
Example = "1234-5678: Awesome File Name"
- Click on
 to end the Wizard and move to the AUP application.
General Information Tab
Filling out the AUP - General Information Tab
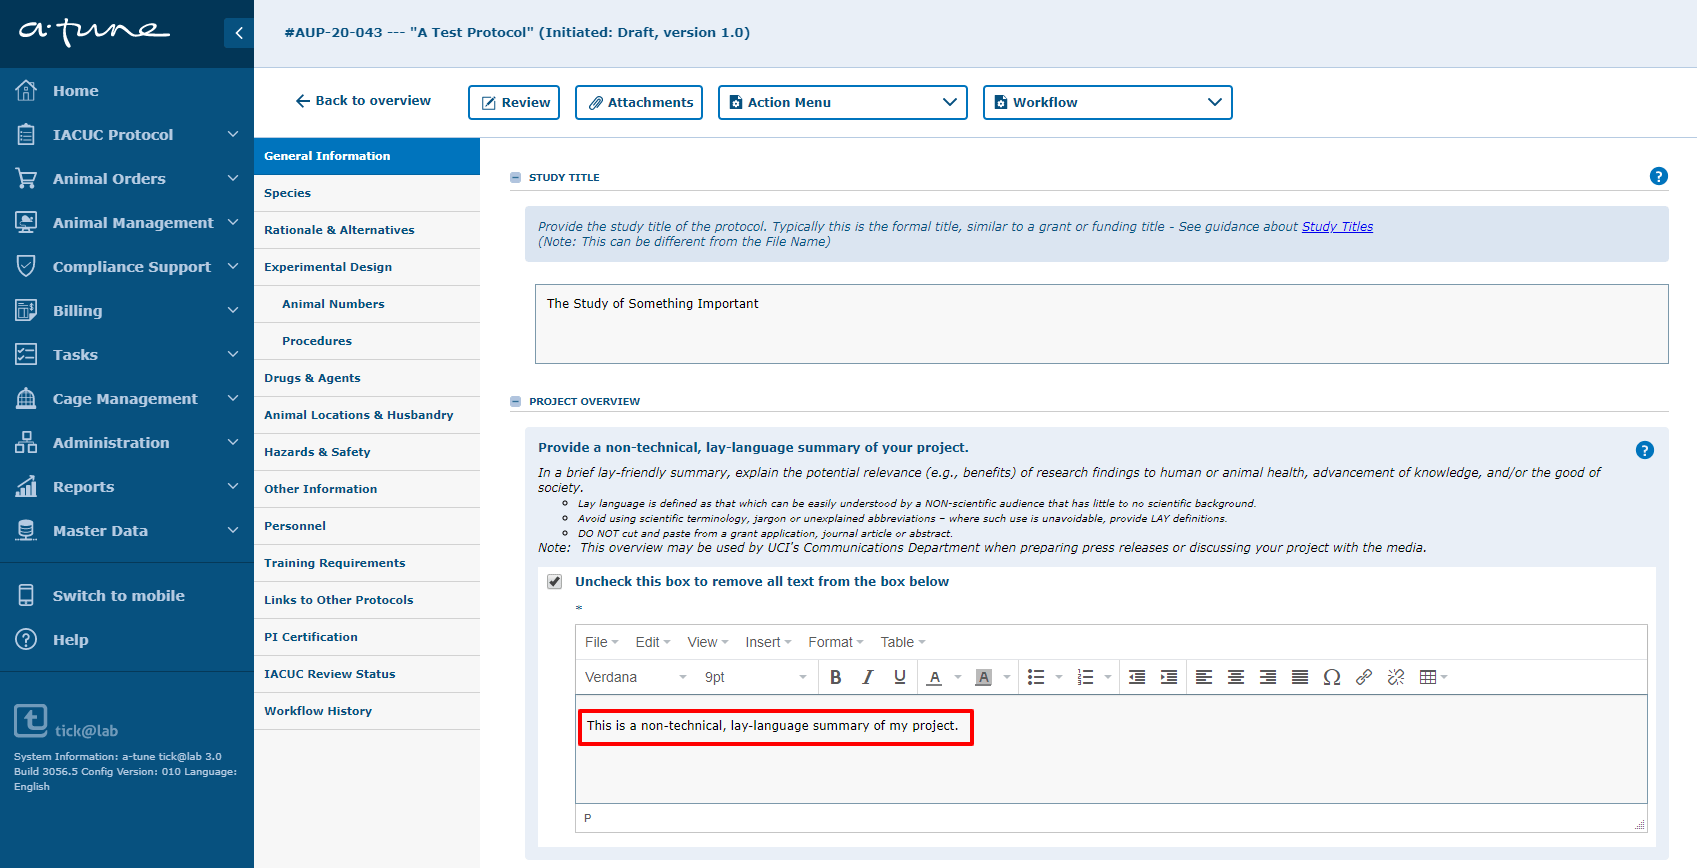
1. In the AUP application workflow, the current tab will be highlighted.
2. The Title or “File Name” from the previous template Wizard will be auto-populated in the current Document Title box.
3. This “File Name” can be replaced with your formal protocol title.
4. This formal protocol title is also called the Document Title.
5. The “File Name” and formal protocol title will both be listed in the AUP File and Documents Section.
6. Enter in the text box your project overview summary in a non-technical, lay language description (250 words or less).
7. The text can be formatted in the rich text field box.
Please try to keep the font type and size consistent within the text boxes.
8. Continue down the page, answering each question. In some cases, answering “Yes” will open up additional questions that request further information.
9. Complete the rest of the sections as appropriate.
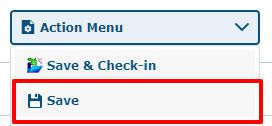
Don’t forget to SAVE YOUR WORK!
Species Tab
Filling out the AUP - Species Tab
- Click the
 button to choose a species.
- A pop-up window will appear - Click on the desired species name to add to the list
- Some species are grouped together into folders (e.g. Amphibians, Birds, Fish, Other Species) – to see the individual species in that group, click on the “+” icon to expand the folder.
- Multiple species can also be listed on the same protocol.
- The species will appear in the “Current selection” list at the bottom of the window.
- Click the
 button - This will finalize your selections and exit the pop-up window.
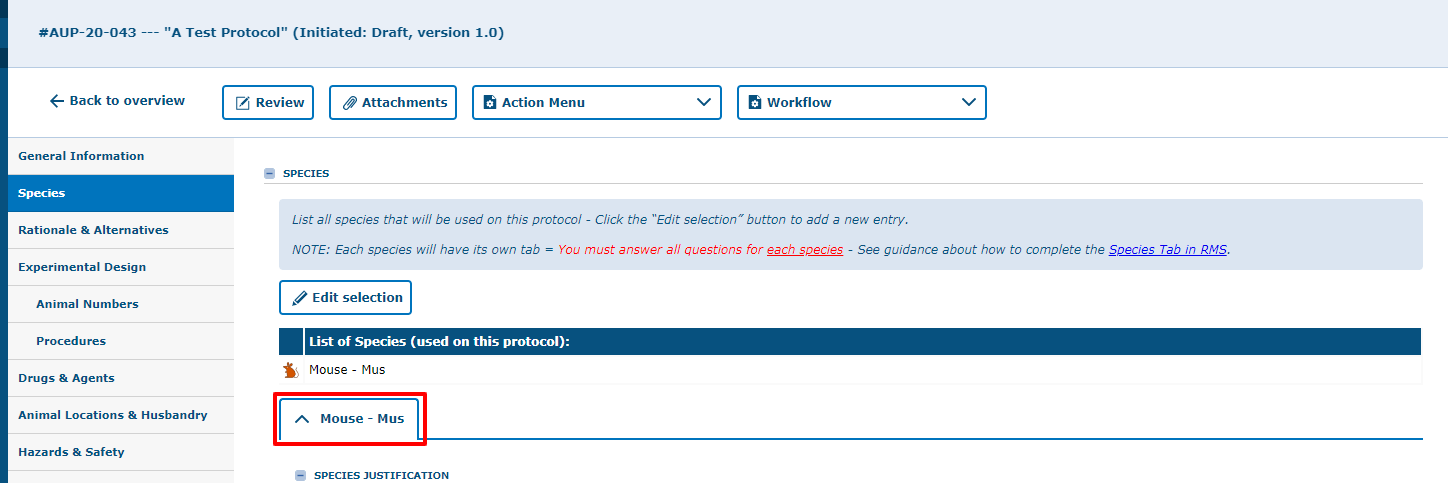
- The species will then transfer to the “Current selection” on the previous page - Each species will have its own separate tab.
- Answer all questions for each species - Click on each tab to switch between species (shaded color = currently selected).
Don’t forget to SAVE YOUR WORK!

Rationale & Alternatives Tab
Filling out the AUP - Rationale & Alternatives Tab
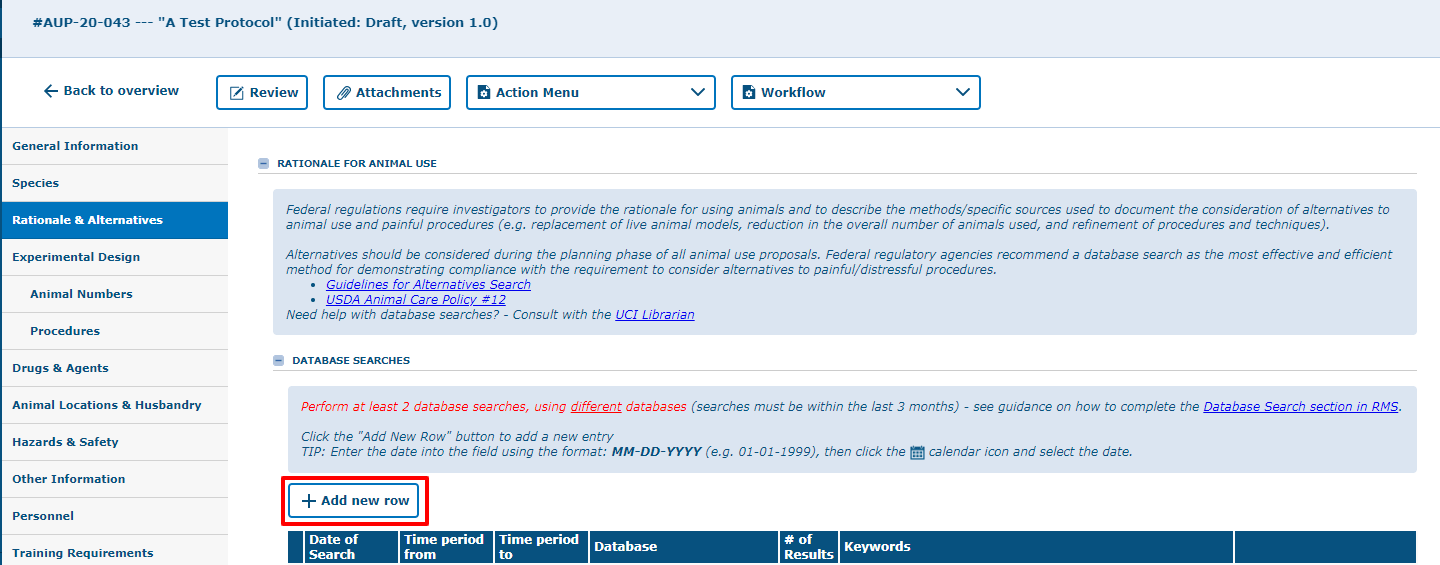
This page is similar to Section 2.B in the paper form EXCEPT for the database search table.
1. Click the ![]() button to create a new database search.
button to create a new database search.
2. Click on the ![]() icon to open a current-day calendar.
icon to open a current-day calendar.
3. Choose a specific date on the calendar and the date will be entered in the text box.
You can also manually enter dates using this format: DD-MM-YYYY and click the icon or “Tab” to the next section.
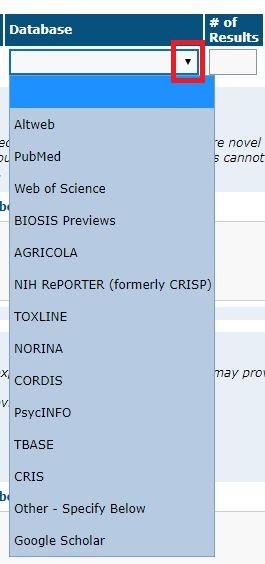
4. Click the ![]() arrow to access the drop-down menu of commonly-used databases.
arrow to access the drop-down menu of commonly-used databases.
5. Answer the questions with regards to the search findings and discuss the search results.
6. Address the “3 Rs” questions.
Don’t forget to SAVE YOUR WORK!

Experimental Design Tab
Filling out the AUP - Experimental Design Tab
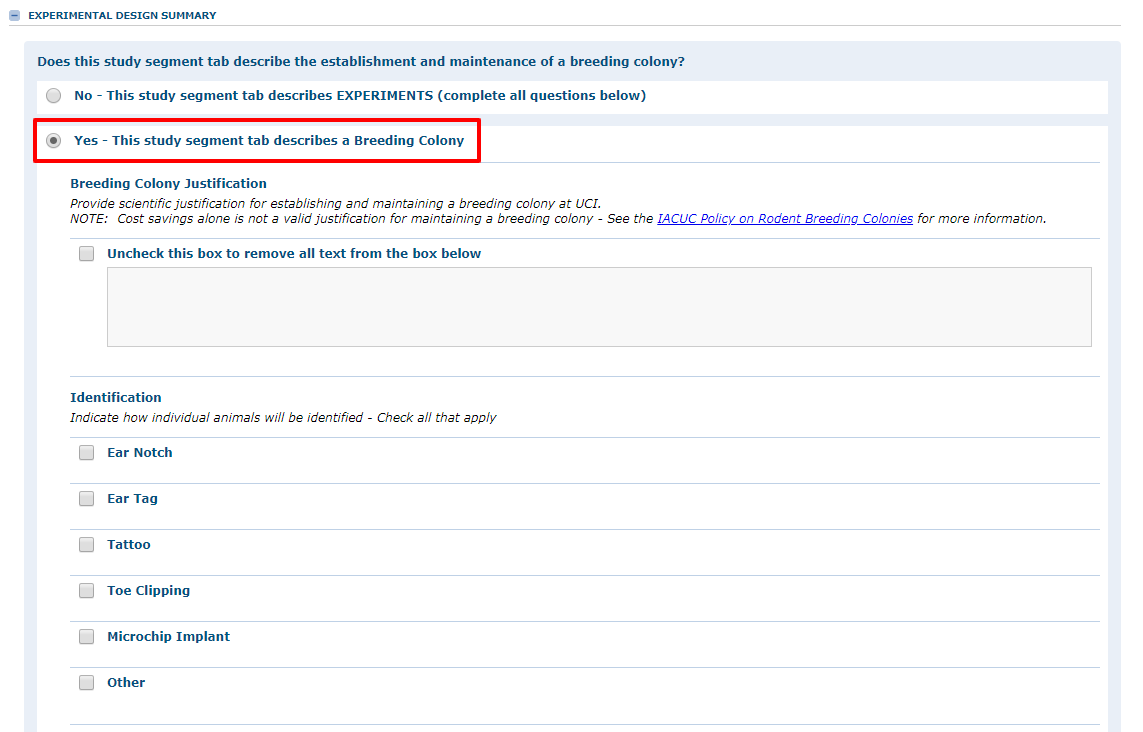
Each study segment corresponds to an individual experiment or set of experiments designed to test a specific hypothesis. An AUP can have one study segment or several.
Animal numbers, procedural details (i.e., non-surgical and surgical procedures), and post-procedural care of animals are defined per study segment.
In a single study segment, one or several species can be added to it. Likewise, individual species can also be assigned to separate study segments. For example, if you are performing identical experiments on two types of species, adding both species to one study segment would be the better option. In this case, you would only need to complete the details of one study segment (summary of experiments, number of animals, procedures, endpoints/monitoring, euthanasia).
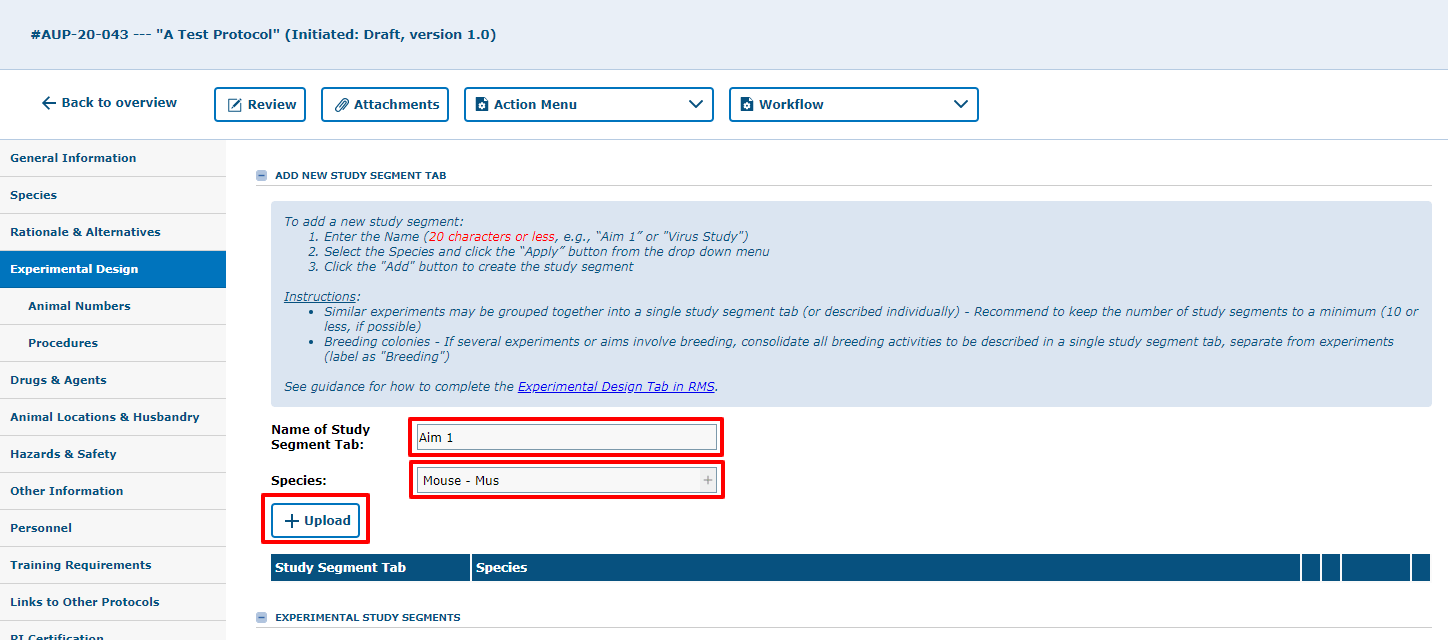
1. Enter a name for the study segment.
2. Then click the ![]() button to bring down a list of species (as defined previously on the Species Tab.
button to bring down a list of species (as defined previously on the Species Tab.
3. Check each box to indicate which species will be used in this section (could be either one or several), then click “Apply”.
4. Click the ![]() button to make the study segment official.
button to make the study segment official.
A new section will open up with a set of questions that must be answered for the specific study segment.
Repeat the steps above for each study segment in the AUP (there can be one or several).
Animal Monitoring
1. Click the ![]() button to select the species designated in the study segment.
button to select the species designated in the study segment.
2. A table will be appear with a species drop-down list. This list will contain all species designated for this study segment.
3. Click on the ![]() arrow and then select the species.
arrow and then select the species.
4. Enter information in the open text fields to the right for each species.
5. Complete the remaining questions if applicable.
Endpoints and Monitoring
1. State the experimental endpoints for each study segment.
For more information, see our policy page on humane endpoints.
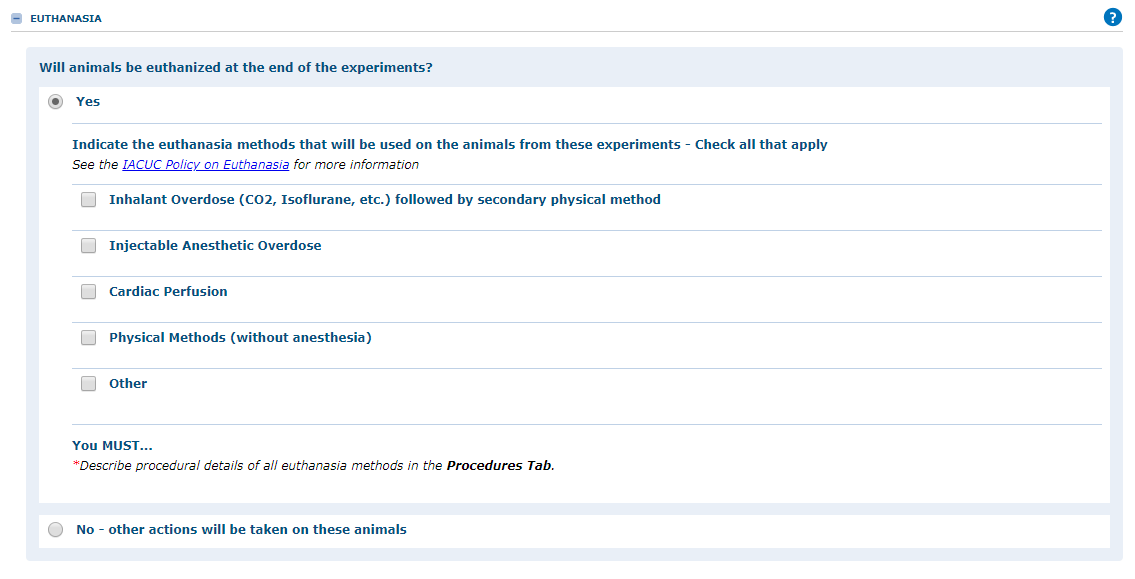
Euthanasia
1. Answer the questions for the euthanasia section.
f the answer is “Yes” for the “Will animals be euthanized at the end of the experiments?”, another question will pop-up.
All euthanization methods will be entered in the Procedures sub-tab of the AUP.
For more information see our policy page on euthanasia.
Animal Numbers Tab
Filling out the AUP - Animal Numbers Tab
The Animal Numbers Tab is where you calculate the number of animals needed for each study segment. The animal calculation section (at the top) performs the calculations based the parameters you enter (e.g., number of experiments, animal groups, types of animals used, etc.). The tool itself may seem complicated at first, but after practice, it can be a handy tool to quickly determine the total numbers for each animal in a given study segment and AUP.
1. Click on the tab to choose the section.
2. Next, click the ![]() button to enter the Animal Calculation tool. A pop-up window will open.
button to enter the Animal Calculation tool. A pop-up window will open.
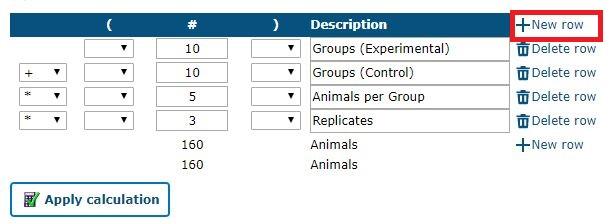
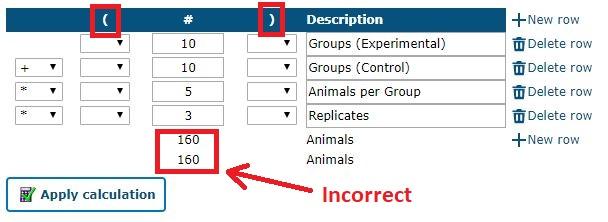
In the Animal Calculation tool, the main or upper “Animals” row is where calculations for the main experiment will be entered. Ignore the lower "Animals" row.
Parentheses are optional and may be used to change the order of operations in both tables.
3. Indicate which species will be used in the current calculation by highlighting the species and clicking the ![]() to move it to the box on the right.
to move it to the box on the right.
4. Then click the upper New row link to start the animal calculation table.
5. A new row will appear above the Animals row with open text boxes for a # and Description.
Description refers to the variables in the experiment (i.e. groups, controls, number of animals, timepoints, replicates, etc.).
6. Enter a # and description in the first row.
7. Click on the top New Row link to continue to add new rows and to build the animal calculation table until all variables are entered for the experiment.
The Animal Calculation tool will automatically give you a running total of the animals.
Notice in this simple example, the total number of animals is incorrect. The correct total should be 300.
8. Add parentheses to change the order of operations and correct the total amount.
9. Click the ![]() button to save/close the Animal Calculation tool and return to the main page.
button to save/close the Animal Calculation tool and return to the main page.
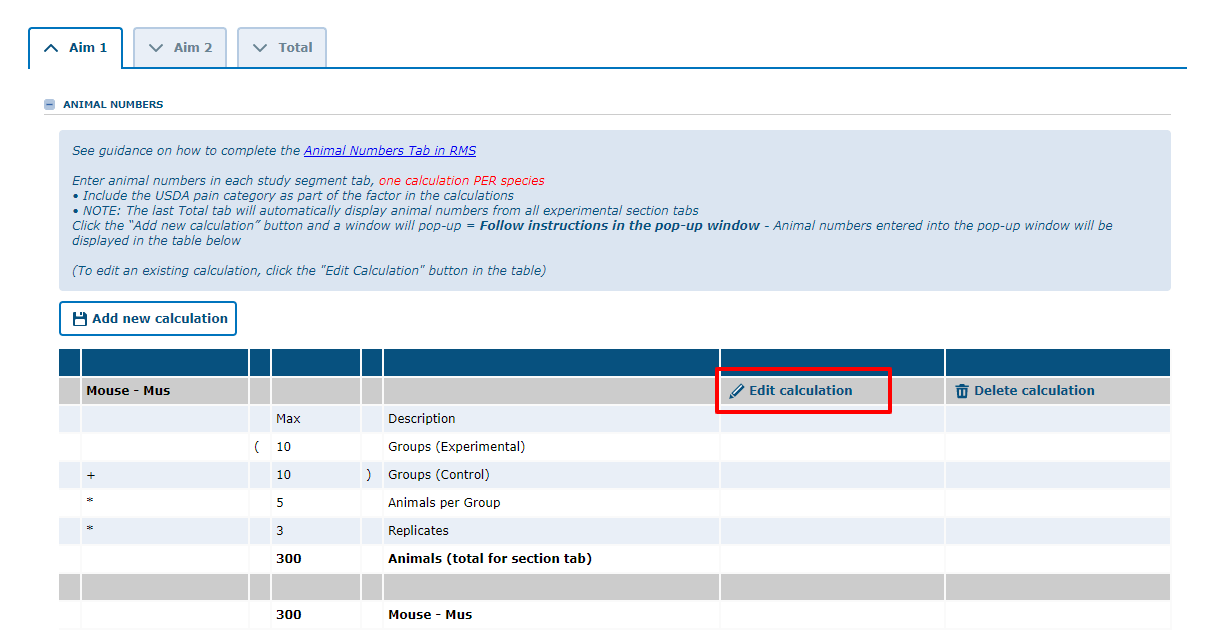
The calculation table will transfer to the main page and will give the total number of animals for the desired species in the study segment.
If you need to make changes or add new calculations to the Animal calculation table. Click the Edit calculation link to go back to the calculation tool. Do NOT click on the Add new calculation button.
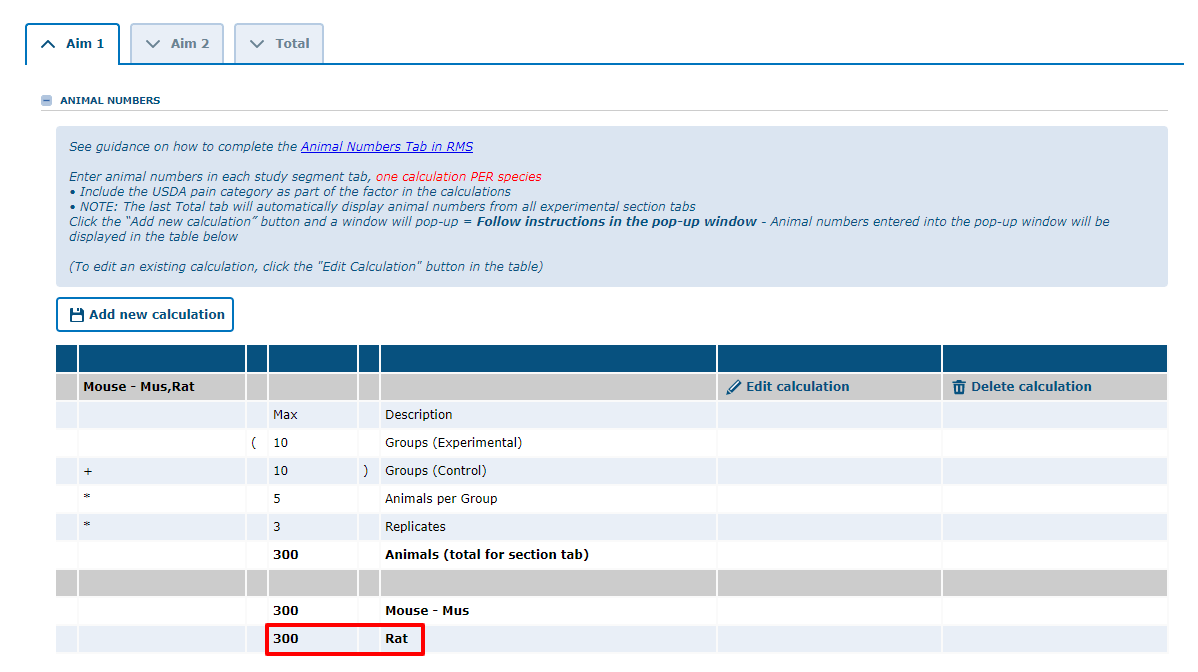
As mentioned previously in this guide, a study segment should include multiple species if performing identical experiments on each type.
10. To add multiple species to the animal calculation, move additional species to the current calculation box.
11. Click the ![]() button again to save/close and return to main page.
button again to save/close and return to main page.
Totals for both species will be present on the main page.
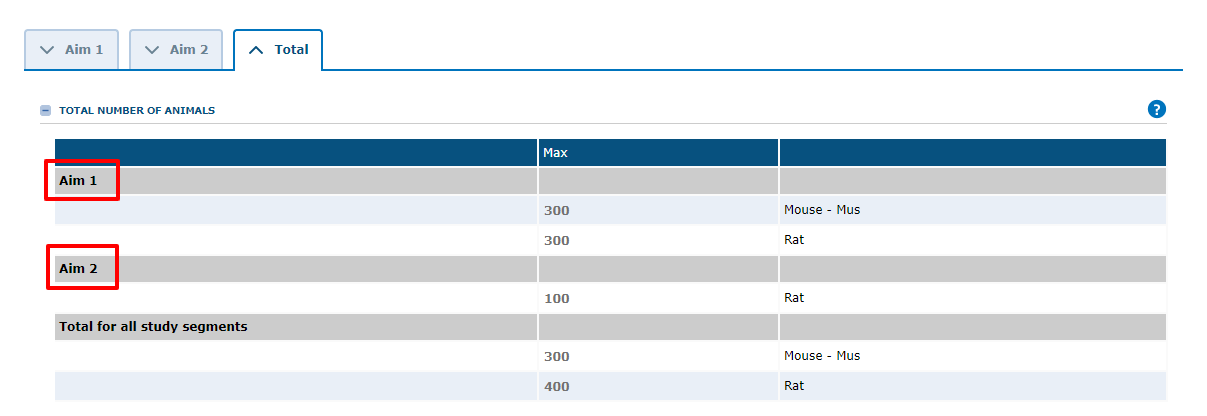
Additional study segments will be included in the total number of animals under the Total tab.
This Total tab calculates the total number of animals per species, NOT the total number of animals (all species).
12. Click the ![]() button to indicate the USDA pain category for each species and the number of animals (Available in the Total tab above).
button to indicate the USDA pain category for each species and the number of animals (Available in the Total tab above).
13. Answer the remaining questions for the Animal Numbers Justification and USDA Pain Category E (if applicable).
Don’t forget to SAVE YOUR WORK!

Procedures Tab
Filling out the AUP - Procedures Tab
The Procedures Tab of the AUP is where details about live animal procedures are described.To complete this tab, there are 2 main steps:
Step 1) List the procedures that will be performed in live animals
Step 2) Assign the species in which those listed procedures will be performed
How to Organize Your Procedures
If you have multiple experimental section tabs (more than one subtab in the Experimental Design Tab), the Procedures Tab will also display those same section tabs.
There are two options you could go about organizing the procedures. You can either:
Option #1
List and describe all procedures in the first section tab + State "Refer to first section tab" in all other section tabs
Go with Option #1 if...
- The same procedures are used across multiple experimental sections
- You are having difficulty adding procedures in the Procedures Selection pop-up window
Option #2
List procedures that are specific to each different section tab
Go with Option #2 if...
- Different procedures are used for each experimental section
For both options, the steps to fill out the Procedures Tab are the same:
-
- Add descriptions into the Procedures Tab by clicking the
 button
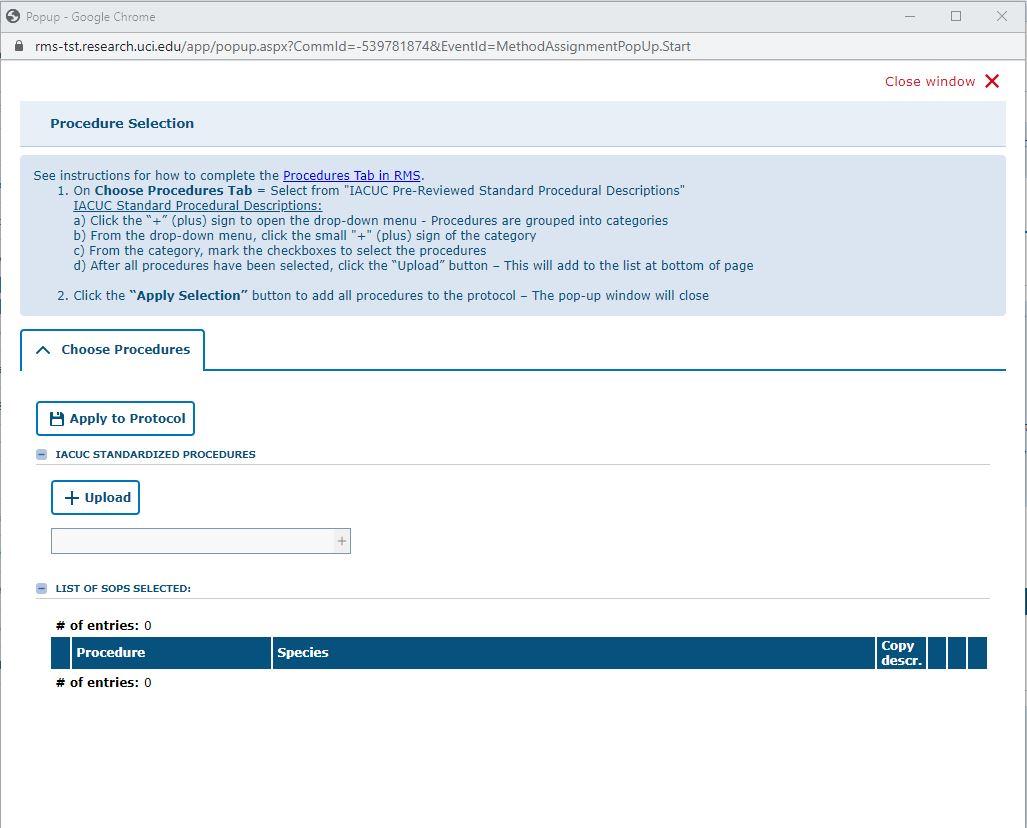
(The Procedures Selection window will pop-up) - In the Choose Procedures Tab of the pop-up window, select the procedures -There are two ways to do this:IACUC Standardized Procedures
= Library of animal procedures with standardized template language reflecting commonly used steps in by the research community. Examples include euthanasia methods, oral gavage, tattoo identification, etc. These templates can be copied as-is or customized by your lab (if needed). Go to view instructions on how to select from IACUC Standardized Procedures - In the Assign Species Tab of the pop-up window (after entering the procedure name and descriptions), mark the checkboxes to indicate the species that will receive those procedures.
- Once you have entered all procedure names, descriptions and assigned the species, click the Accept Selection button - This will apply the information entered in the pop-up window into the Procedures Tab of the AUP (window will close)
- Look over the Procedures Tab of the AUP for completion and ensure that:
- "Procedures List" displays the names of all live animal procedures that will be performed
- Species are indicated in the "Procedures List"
- Under "Descriptions of Procedures", provide the procedure names before the description details
- Add descriptions into the Procedures Tab by clicking the
Don’t forget to SAVE YOUR WORK!

IACUC Standardized Procedures
Filling out the AUP - Using Template Procedures
Option 1) All procedure descriptions entered into the first study segment, with other study segments referring to the first study segment
OR
Option 2) Procedure descriptions specific to each study segment
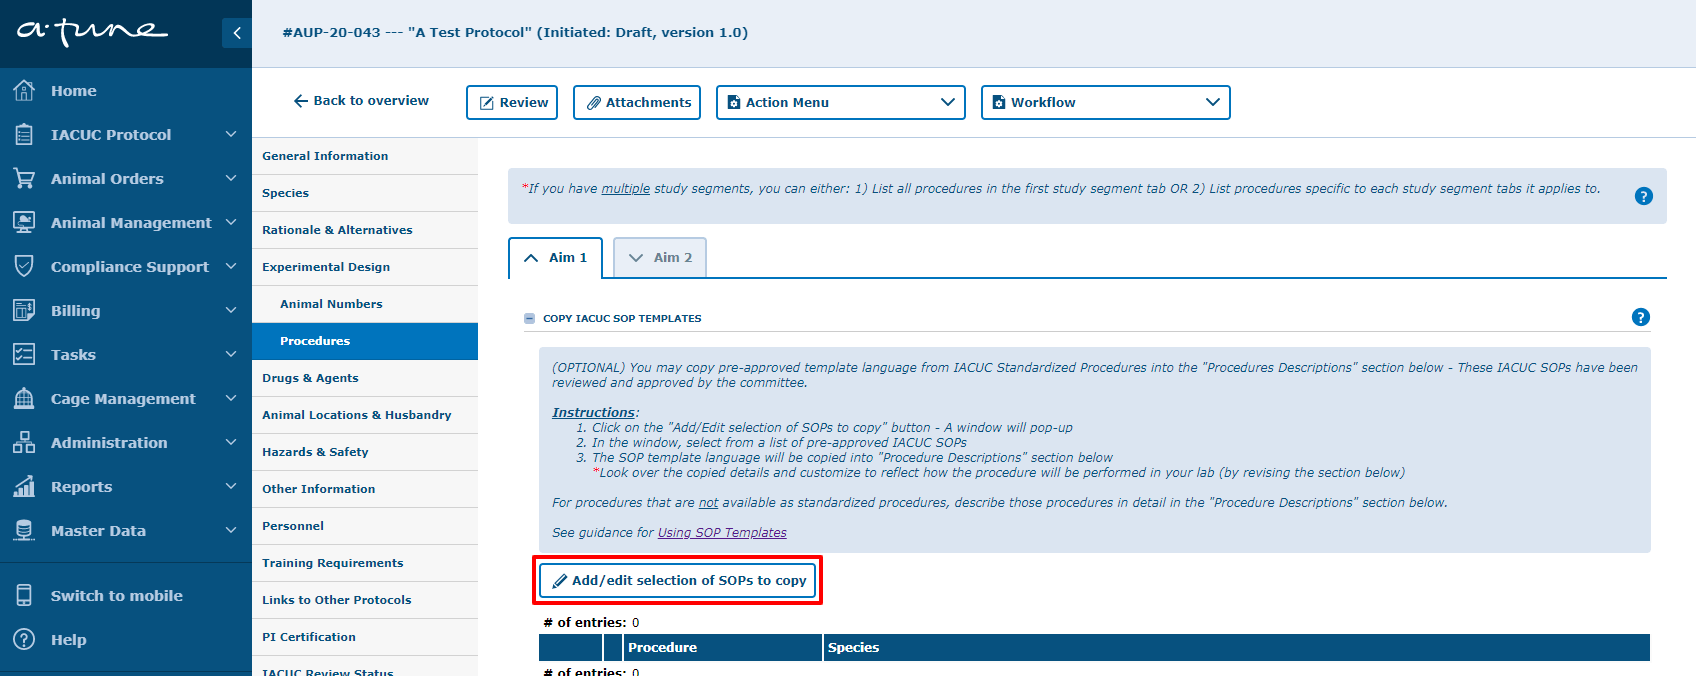
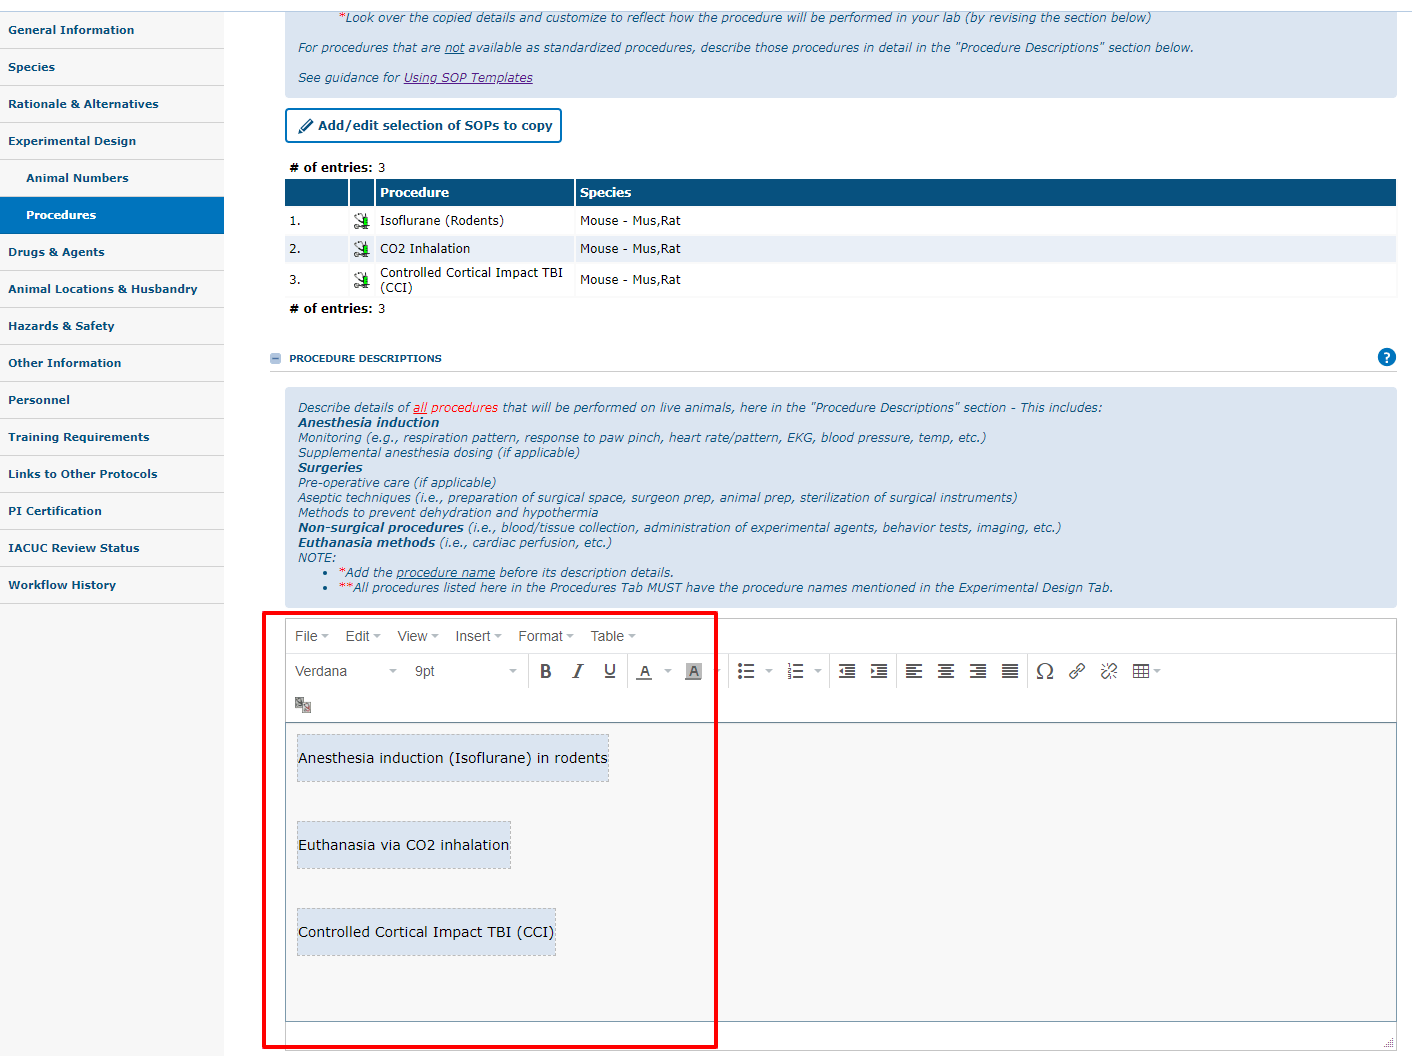
RMS has a list of pre-approved descriptions (“IACUC Standardized Procedures”) from which you can select to have the procedure language populated into your AUP's Procedure Tab. If a particular IACUC SOP is not available, you will need to write your own procedure description.
1. Click the ![]() button to add/edit procedures for the selected study segment.
button to add/edit procedures for the selected study segment.
2. A pop-up window will appear with IACUC Standardized Procedures
3. Click the ![]() button to expand the drop-down list of IACUC SOP's.
button to expand the drop-down list of IACUC SOP's.
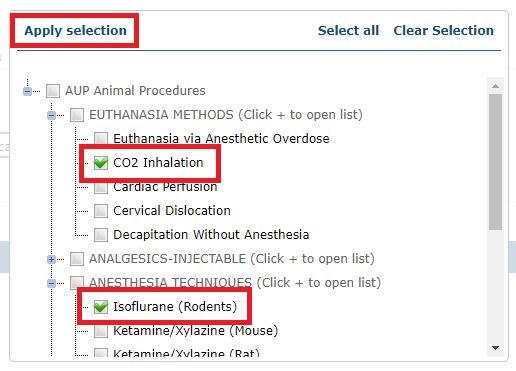
4. Expand each Procedure by clicking on the ![]() next to it.
next to it.
5. Mark the checkbox ![]() to select the desired procedures.
to select the desired procedures.
6. Click the ![]() button to move forward with your selections - this will close the list.
button to move forward with your selections - this will close the list.
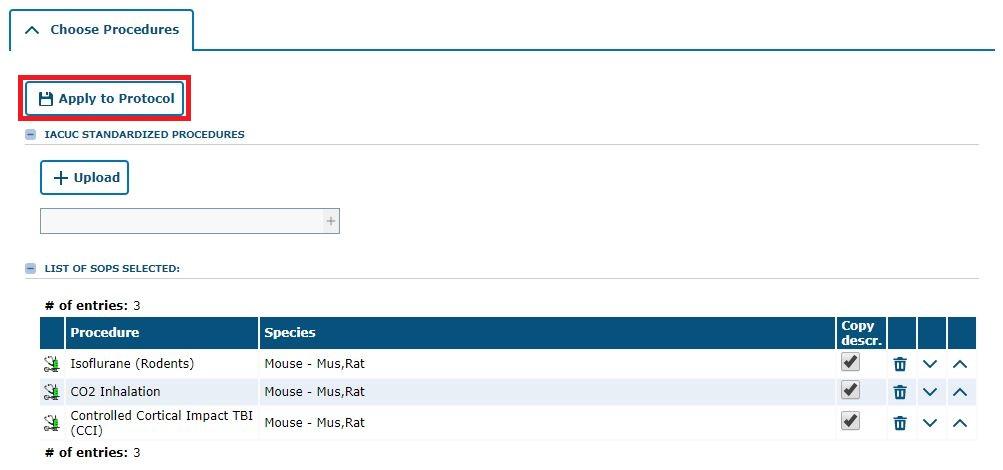
7. Click the ![]() button to finalize your selection of IACUC SOP's - this will be indicated at the bottom of the pop-up window.
button to finalize your selection of IACUC SOP's - this will be indicated at the bottom of the pop-up window.
Next to each procedure is a ![]() icon. This icon represents a standardized, IACUC-approved procedure.
icon. This icon represents a standardized, IACUC-approved procedure.
8. Finally, click the ![]() button and language from your selected IACUC SOP's will be applied to the Procedures Descriptions field.
button and language from your selected IACUC SOP's will be applied to the Procedures Descriptions field.
In addition, the description of each procedure will automatically populate the text box below!
Don’t forget to SAVE YOUR WORK!

Drugs & Agents Tab
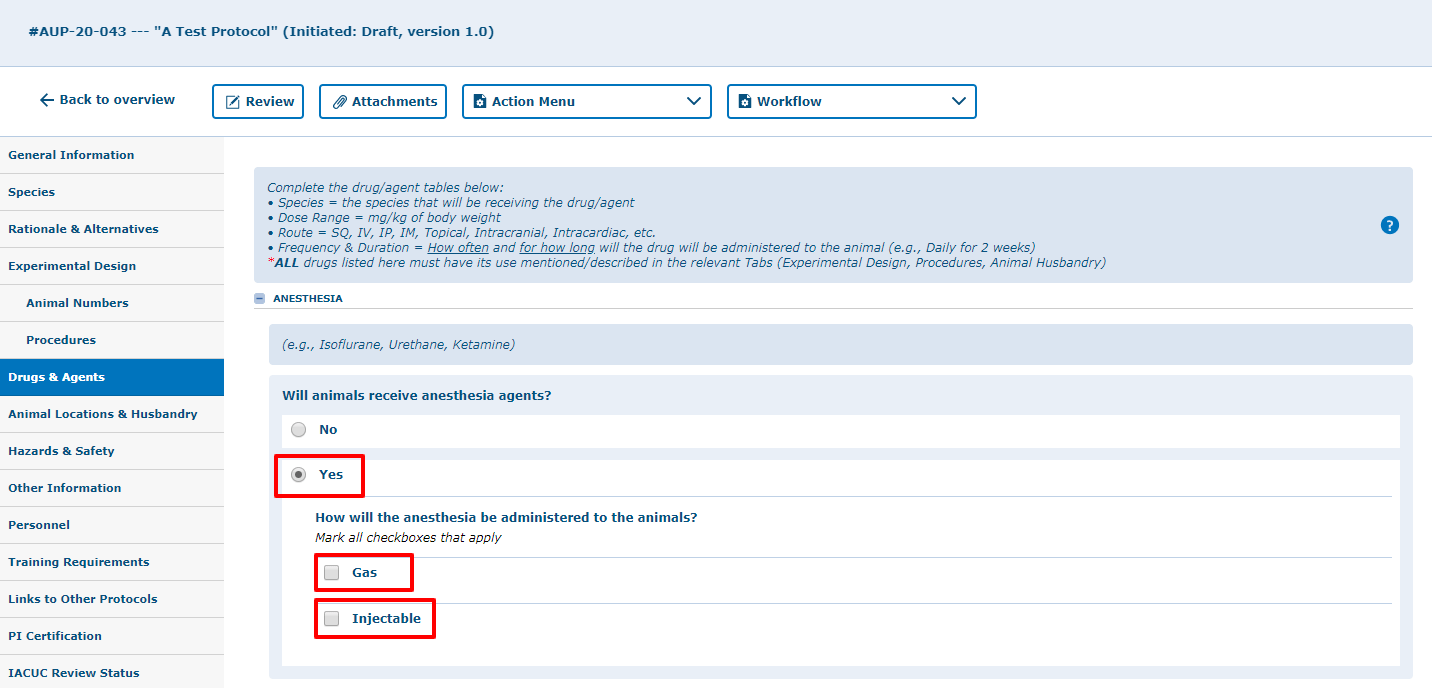
Filling out the AUP - Drugs & Agents Tab
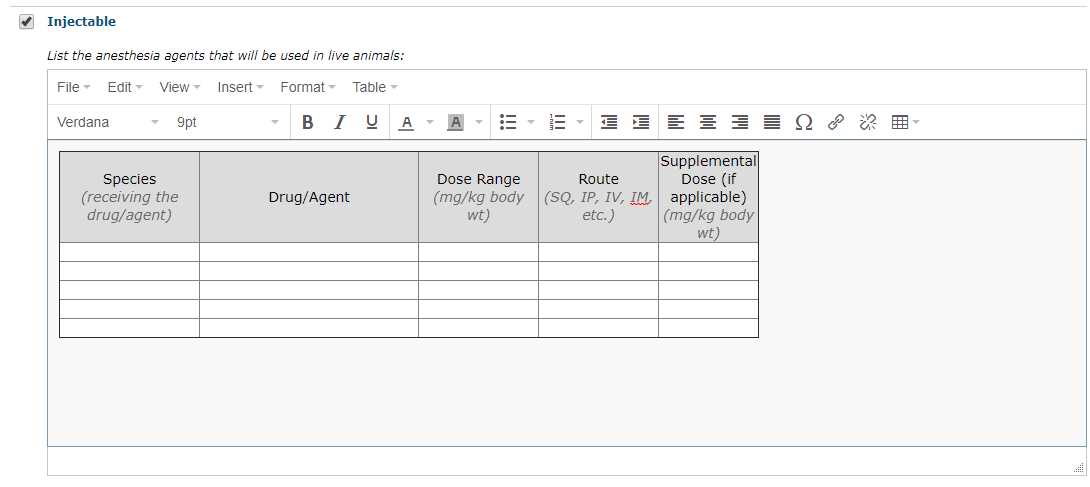
Download a copy of the drugs and other agents template.
1. Clicking “Yes” will open up a rich text box with the embedded template inside.
To expand the text field, click/hold the right bottom corner and drag your mouse down.
2. Complete the template for each drug or agent that will be used in the AUP and answer the rest of the questions.
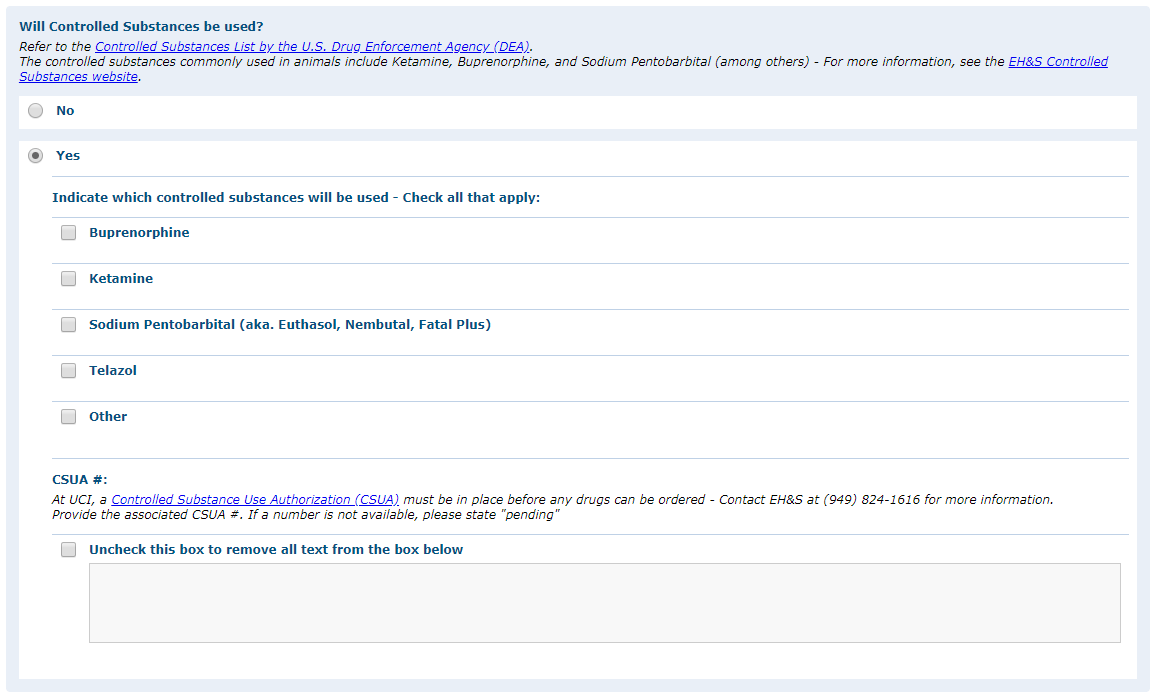
3. Complete the Controlled Substances questionaire and enter the Controlled Substance Use Authorization #.
Please contact EH&S at (949) 824-1616 for more information.
Don’t forget to SAVE YOUR WORK!

Animal Locations & Husbandry Tab
Filling out the AUP - Animal Locations & Husbandry Tab
Some responses will open up additional questions.
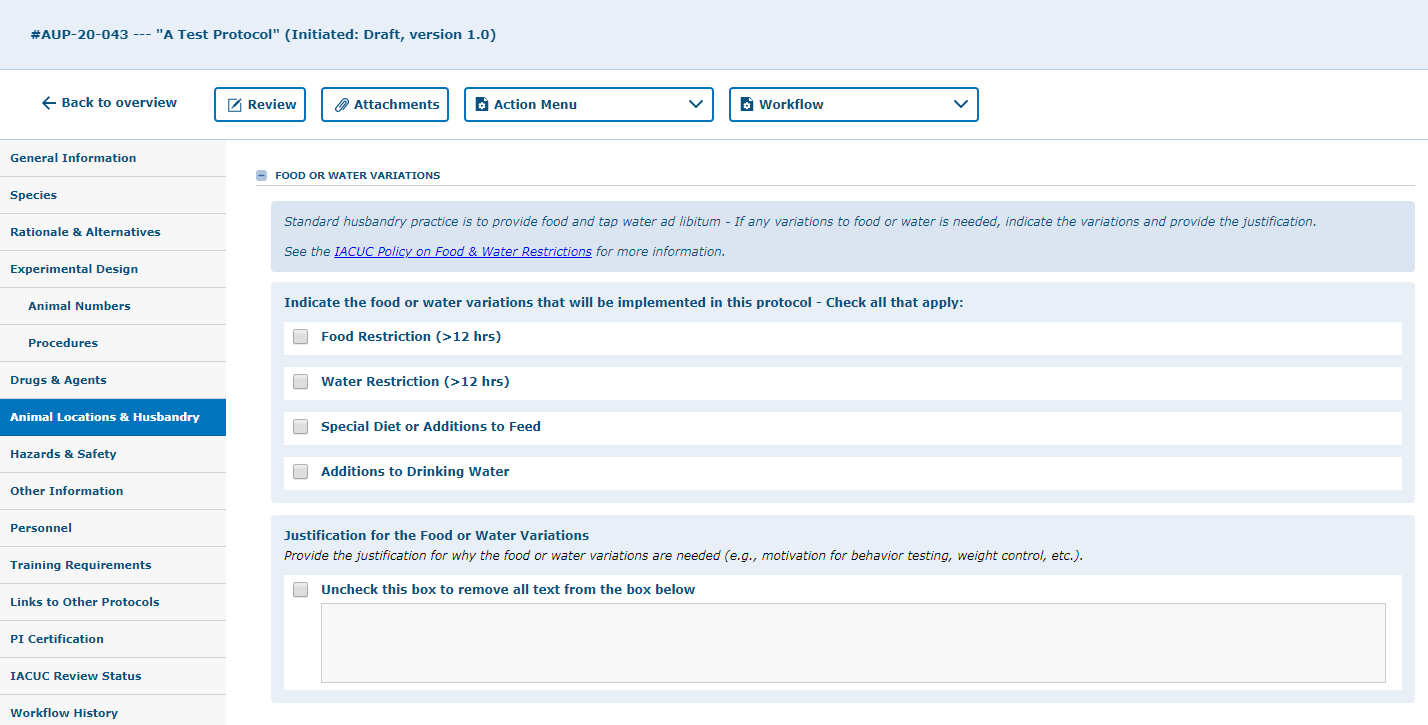
1. Complete the following sections only if your research includes variations to the food and water standards. If a question does not apply to your research, you can either check “No” or just skip the question.
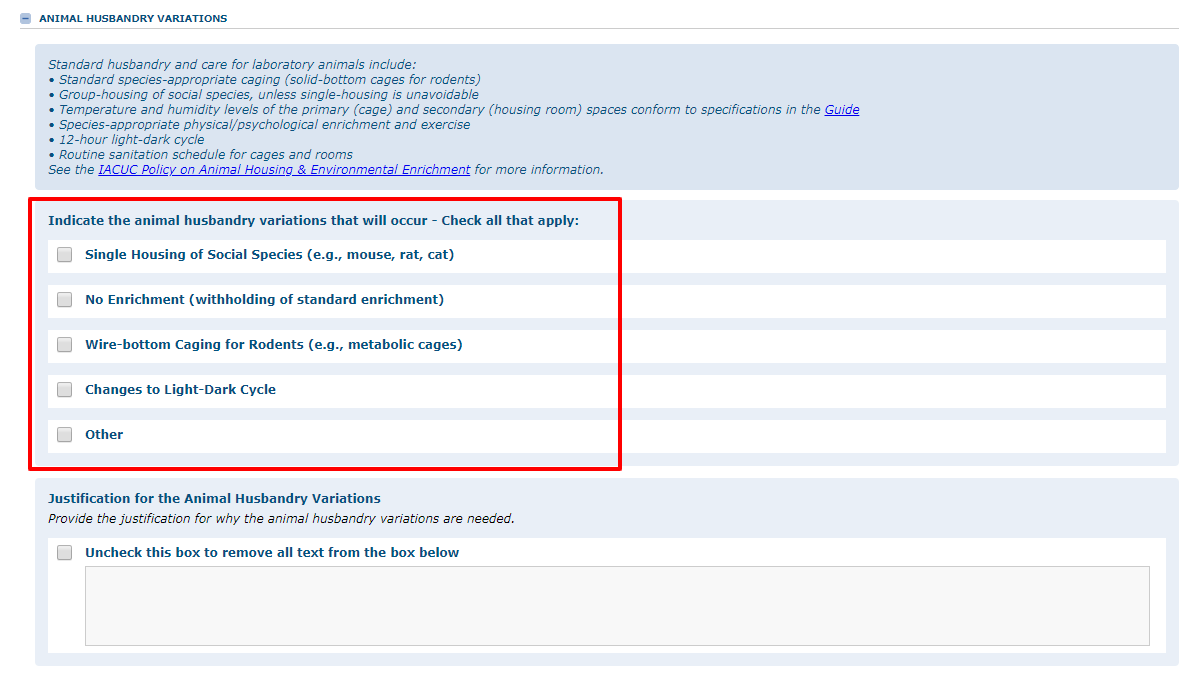
2. Complete this section to describe variations that differ from standard husbandry and care.
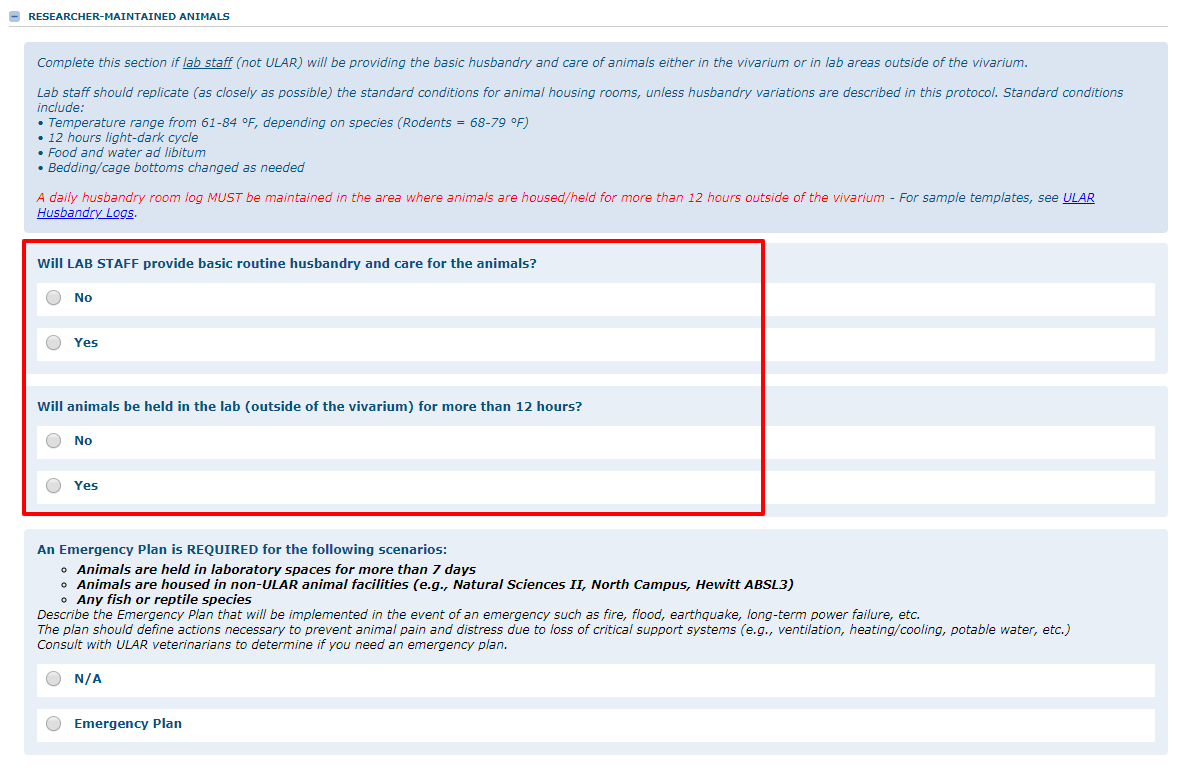
3. Complete this section if husbandry and care will be provided by the laboratory staff instead of ULAR husbandry staff.
4. Complete this section to describe variations that do not fall into the general categories above.
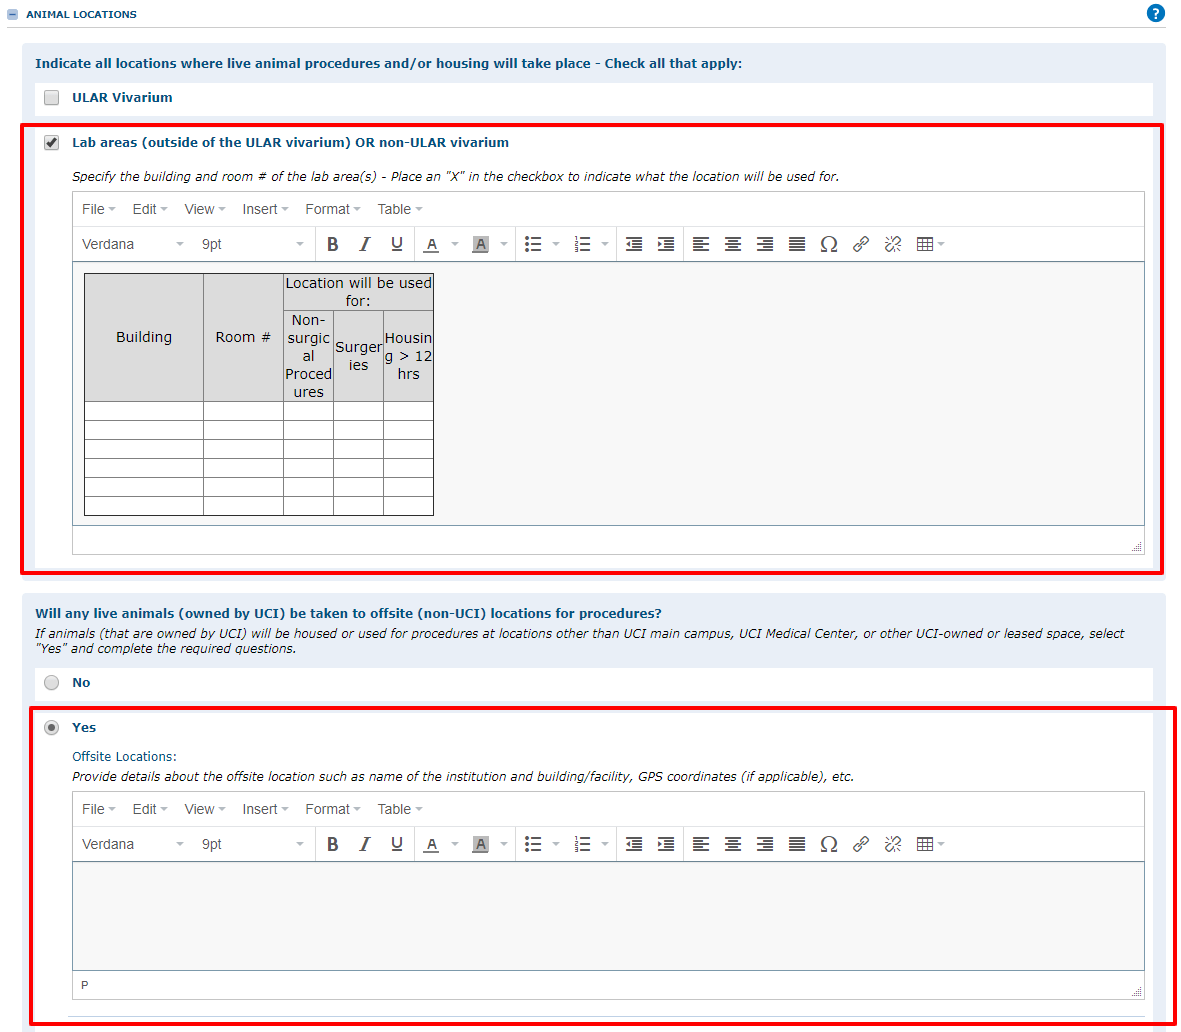
5. Enter the lab area(s) (outside of the vivarium) where live animals are taken to for any procedures or housing in the pre-populated table. Also answer the following question if any animals will be housed off-site.
Don’t forget to SAVE YOUR WORK!

Hazards & Safety Tab
Filling out the AUP - Hazards & Safety Tab
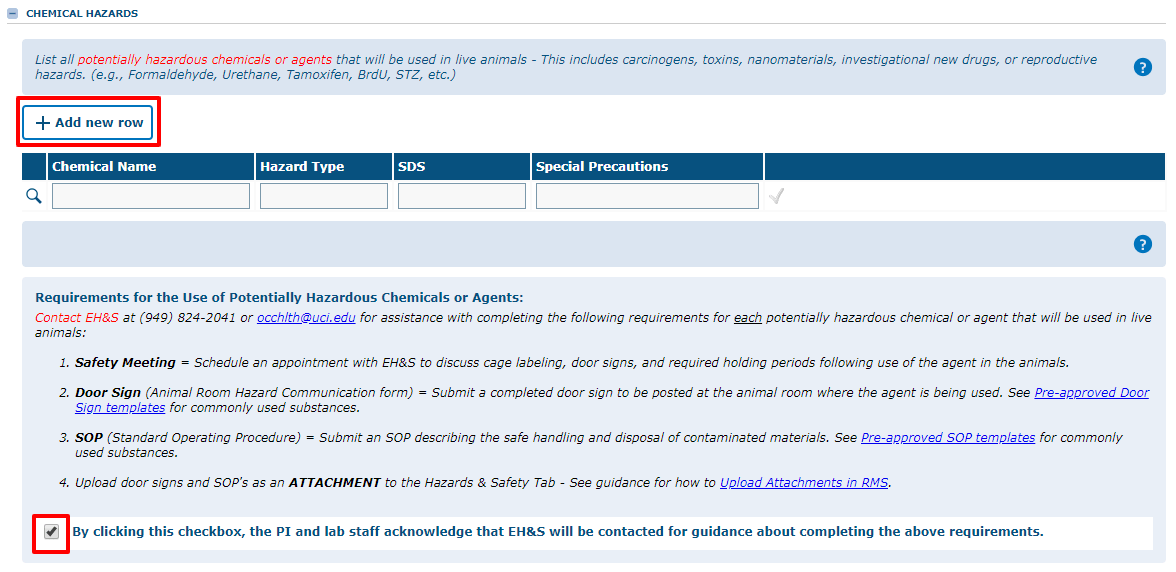
Several sections in this tab contain an ![]() button to list biological, chemical or radiological materials.
button to list biological, chemical or radiological materials.
1. Click the ![]() button and fill in the table with information about any chemical hazards.
button and fill in the table with information about any chemical hazards.
NOTE: Most of the boxes in this table are open text fields - just click and type.
2. Check the box to acknowledge that EH&S will be contacted for guidance as you complete each requirement. All materials (e.g. door signs, SOPs) should be uploaded as attachments to your AUP.
The following sections in this tab all include similar tables and questionnaires to enter hazard & safety information:
- Chemical Hazards
- Biological Materials, Primary Cells or Cell Lines
- Infectious Agents
- Recombinant DNA
- Radioactive Hazards
- Creation of New Transgenic Animals
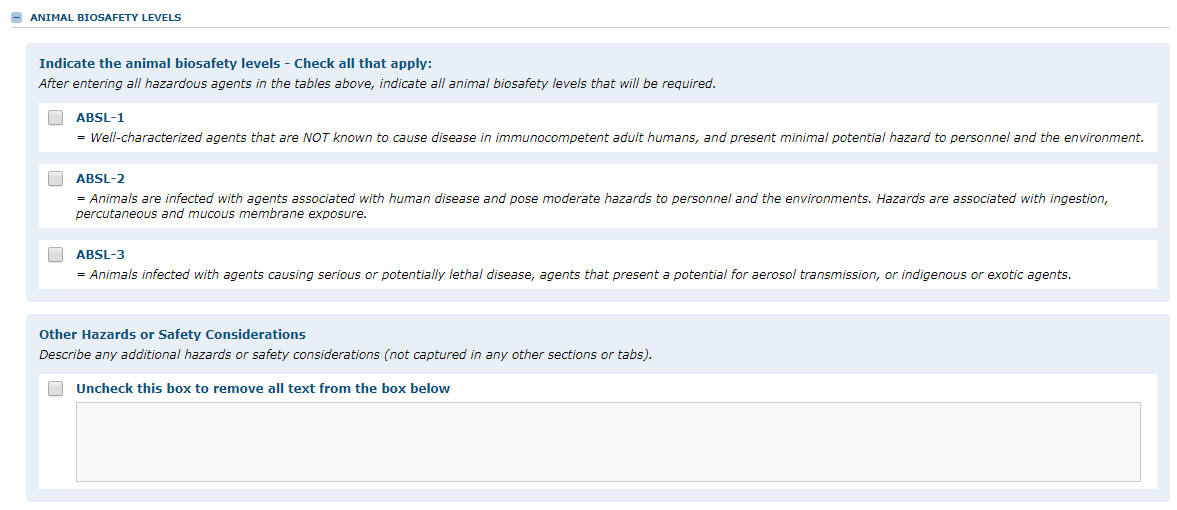
3. Indicate the Animal Biosafety Levels (ABSL) - Check all that apply. Also, describe any additional hazards associated with the research project.
Don’t forget to SAVE YOUR WORK!

Other Information Tab
Personnel Tab
Filling out the AUP - Personnel Tab
In order to be listed on an AUP in RMS, an individual needs two things:
- UCInetID
- This ID identifies you as an affiliate of UC Irvine. UCInetIDs are assigned by the Office of Information Technology (OIT)
- Usually this is the username that can be found in your UCI email address (i.e.: panteater@uci.edu) - although your UCInetID may differ from your UCI email address!
- Entered as a user with a defined role (or multiple roles) in the Kuali Security Access Management System (KSAMS)
- This is like a “membership in the club” – it tells the secure servers that you are authorized to use RMS.
- IACUC administrative or eRA office can grant permission for you and your staff in KSAMS and assign the roles you and your staff will need to access RMS.
Personnel Categories in RMS | RMS Permissions |
|
|---|---|---|
| Principal Investigator | aka. Lead Researcher | Protocol Editing Animal Ordering View Protocol |
| Faculty Sponsor | Individual with Lead Researcher Eligibility who is sponsoring the work on behalf of the listed PI | (same as PI) |
| Co-Investigator/Senior Researcher | Anyone in the study team who needs protocol editing permissions (e.g., project scientist/specialist, postdoc) | Protocol Editing Animal Ordering View Protocol |
| Research Personnel | Anyone who needs permission to order animals (e.g., lab manager, lab technicians) | Animal Ordering View Protocol |
| Other Research Personnel | All other personnel who do not need any other permissions, View Protocol Only (e.g., undergraduate or graduate students/researchers) | View Protocol |
| Signers | IACUC Use Only - Signatures are required from individuals listed in this category - IACUC admin staff will assign this. | |
| Pre-Reviewers | IACUC Use Only - Individuals listed here are performing the preliminary veterinary, admin, or EH&S pre-review | |
Adding New Users to RMS
- New students, staff or faculty to UCI will not be available in the RMS database. To add new users, please complete Step 10 below. If you need to add lab personnel right away, please contact the IACUC at:
(949) 824-8664
Adding Personnel to Your Protocol
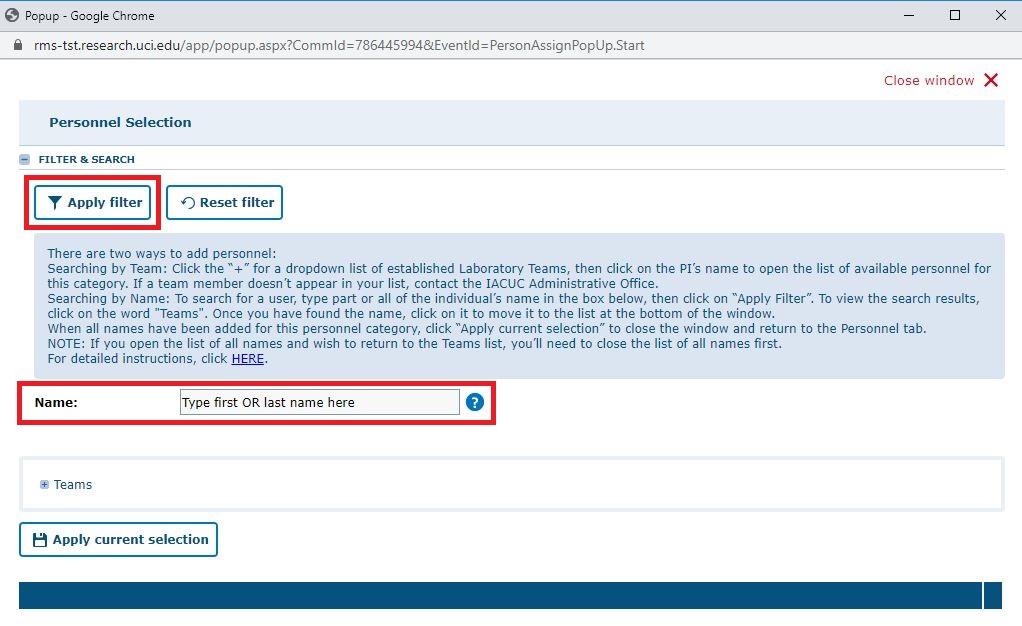
- For each personnel category, click on
 A window will pop up
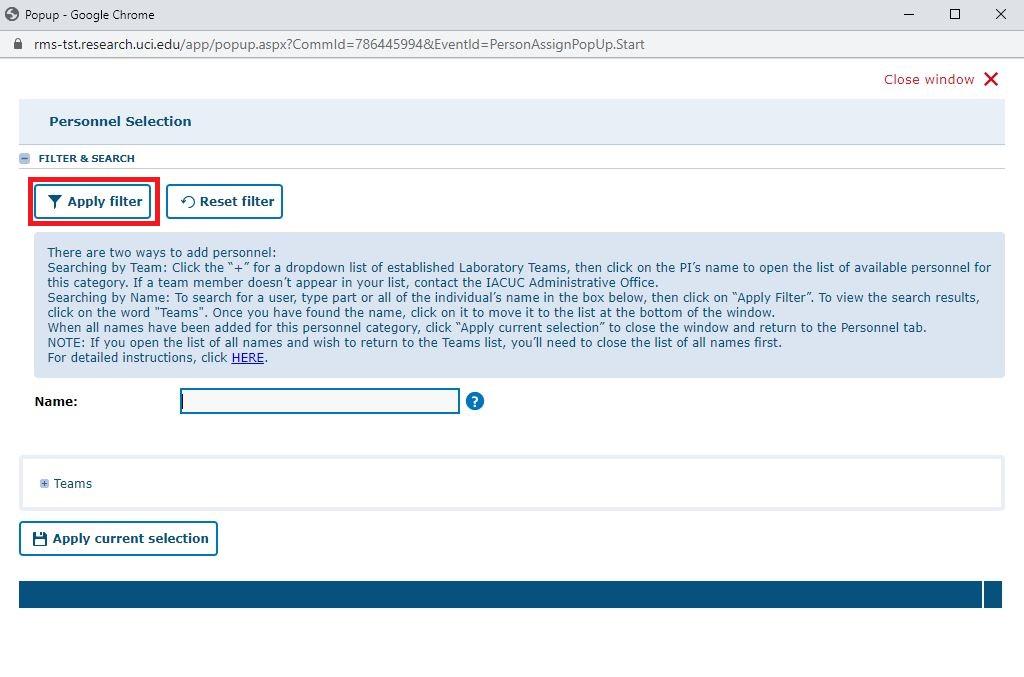
- In the Personnel Selection window, enter the name of the individual you wish to add to the protocol into the Name field.
- Tip: Search by first OR last name, but not both! Searching by UCInetID also doesn't work.
- After entering the name, click the
 button. Nothing will happen. Do not be alarmed!
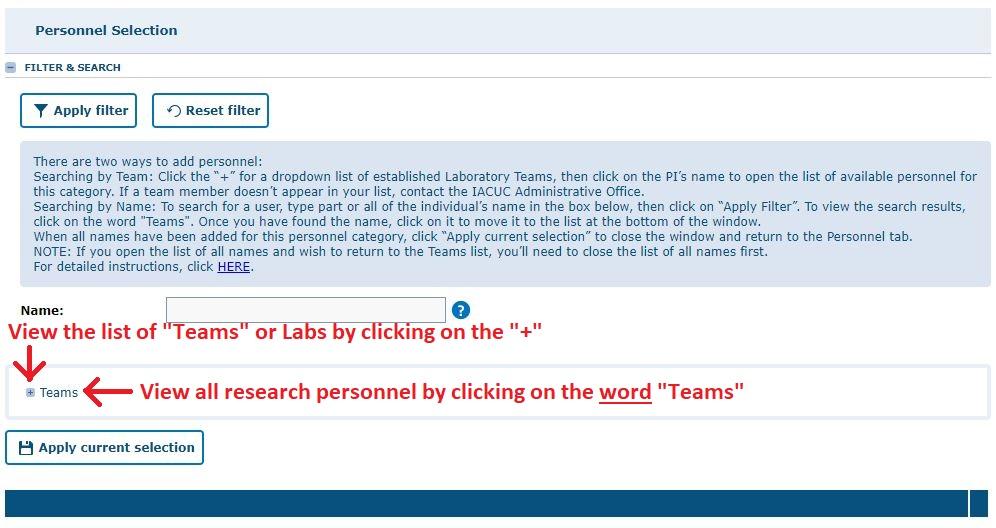
- Click the word
 and this will display the user's name.
- If you click the word "Teams" without filtering by name, this will display a long list of users - You could scroll and look for the individual, but this is time-consuming and not recommended.
- If you click the
 icon without filtering by name, this will display users grouped by Labs - This is a much easier way to add lab members to your protocol.
Reminder:
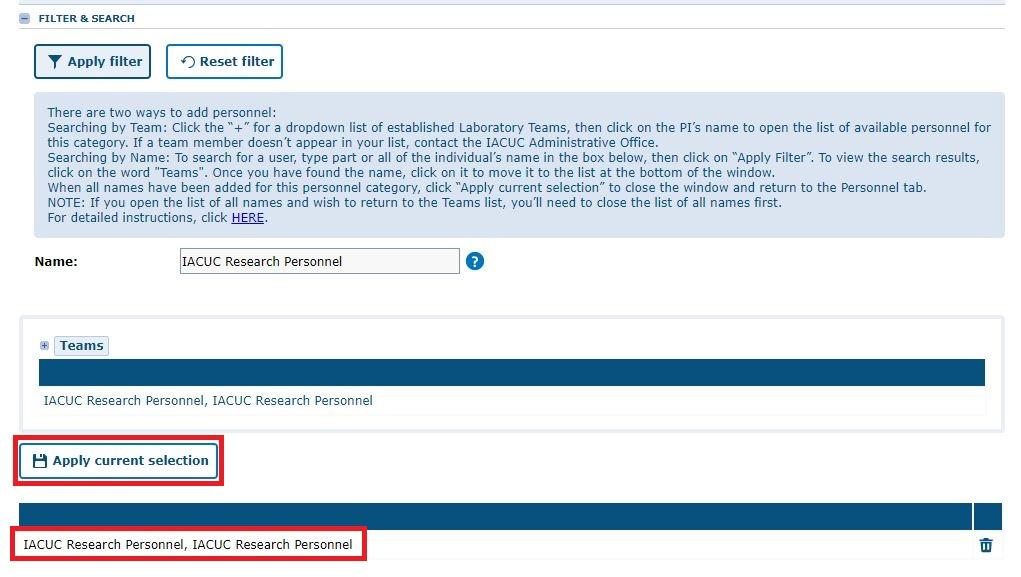
- Click the individual’s name in the list and their name will be added to the list at the bottom of the window.
- The individual will only be available if he or she has the correct RMS roles for that corresponding category - If you do not see them here, skip to Step 10
- Repeat Steps 2-4 to find and add all individuals to the category
- Once all individuals is included in the list at the bottom of the window, click the button
 - This will add their names into the category.
- The pop-up window will close and you should see the selected users under the appropriate personnel category.
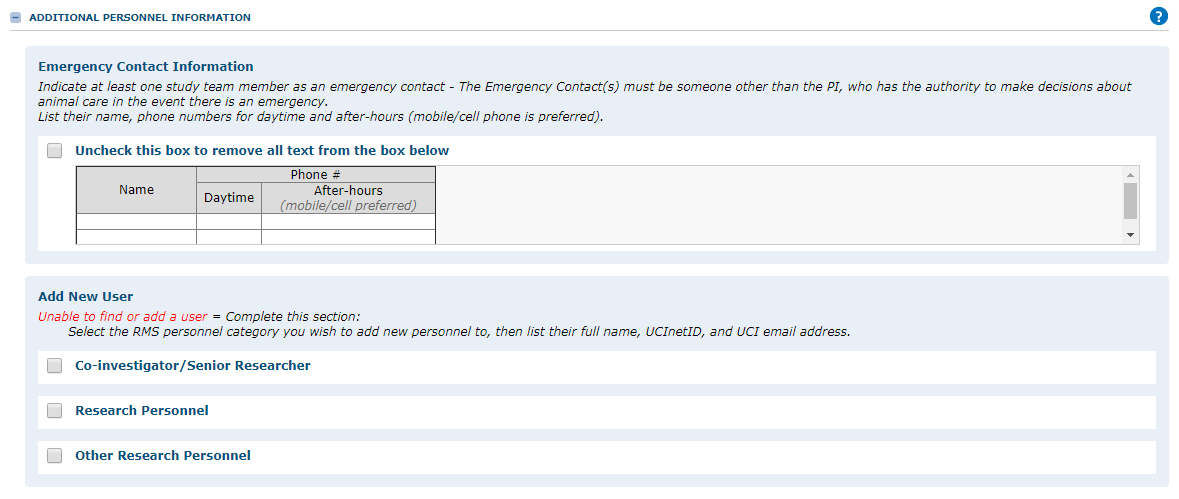
- Enter emergency contact information for the lab in the table provided in case of an emergency regarding animal care.
- If you're unable to find the individual, complete the Add New User section
- List the person’s name, UCI email address and state which personnel category you wish to add them to
- Note: Multiple individuals can be listed!
Don’t forget to SAVE YOUR WORK!

Training Requirements Tab
Filling out the AUP - Training Requirements Tab
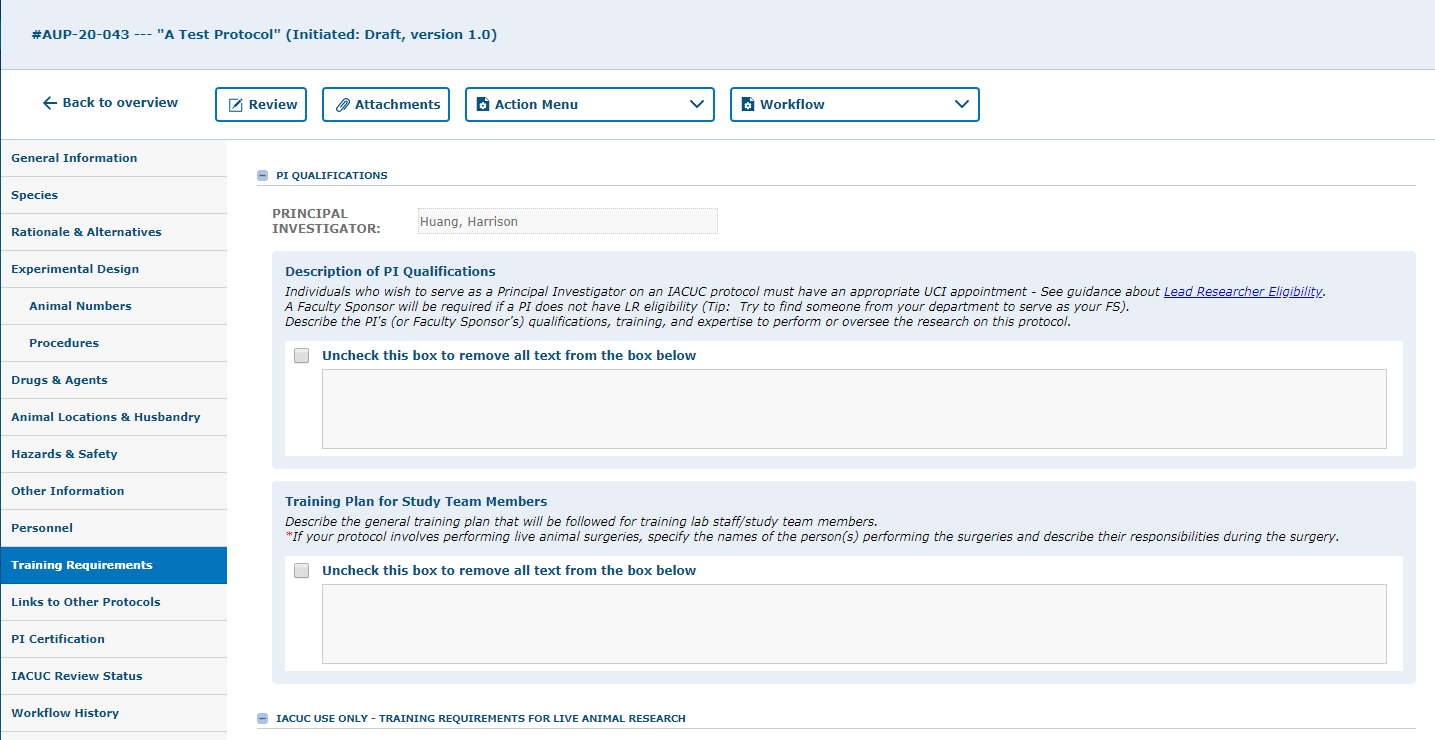
Principal Investigator Qualifications
1. Complete only the “Principal Investigator Qualifications” section.
2. Describe the PI’s qualifications, experience and role for the project in this text box.
Read more about Researcher Eligibility on our Protocol Preparation Checklist.
Training Plan
1. Describe how each member of the study team will be trained to perform the live-animal procedures in this study.
Don’t forget to SAVE YOUR WORK!

Links to Other Protocols Tab
Filling out the AUP - Links to Other Protocols Tab
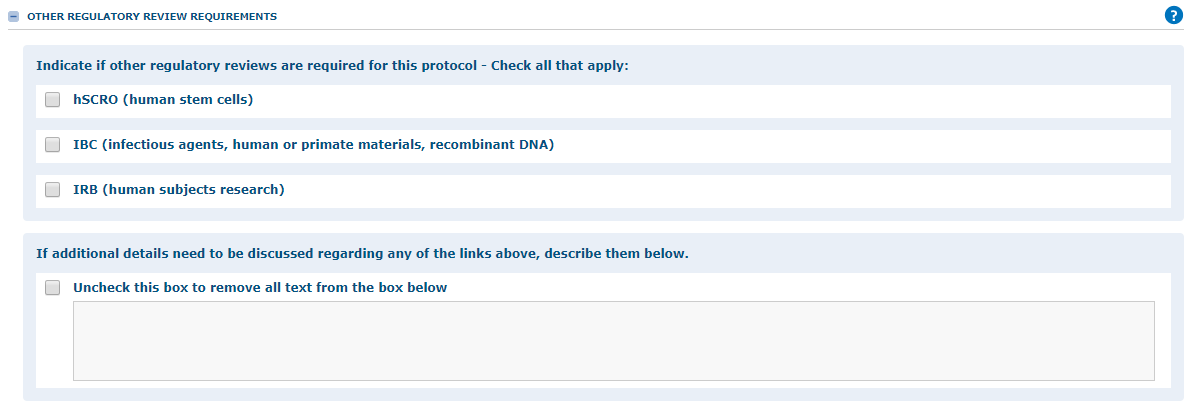
This is where you provide information about other regulatory-committee reviews associated with your current AUP.
You can also link the current AUP to a previously approved AUP or collaborator's protocol.
1. Click the ![]() button to open a pop-up window containing an AUP list.
button to open a pop-up window containing an AUP list.
2. Click the ![]() to choose the AUP template.
to choose the AUP template.
3. A list of approved AUPs associated to your profile will be available.
4. Click the ![]() sign to add the protocol.
sign to add the protocol.
5. The linked protocol will move to the bottom of the current selection list.
6. Click the ![]() button to save and close the window.
button to save and close the window.
The linked AUP will transfer to the previous page.
7. Answer the additional questions regarding other regulatory review protocols (hSCRO, IBC, IRB) and discuss any additional details for the links above.
Don’t forget to SAVE YOUR WORK!

PI Certification Tab
Filling out the AUP - PI Certification Tab
- Review the Terms & Conditions of IACUC Approval, and then mark the acknowledgement checkbox at the bottom - to indicate your understanding and acceptance of the PI responsibilities.
- Save & Check-In (from the Action Menu)
- Once ready to submit the protocol, at the top go to Workflow menu > Select Submit to IACUC.
And you're done!
- Now you wait for confirmation of your protocol submission going to FCR (full committee review) at the convened IACUC meeting -- You will receive an email notification.
- For questions about your submission, contact IACUC@uci.edu.
