Getting Started in KR Proposal Development
Logging In
- Go to Zot!Portal (portal.uci.edu).
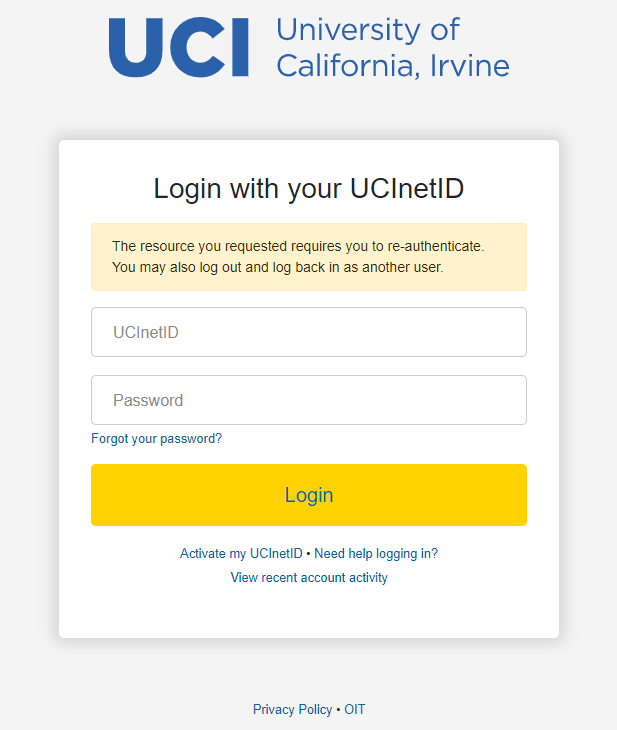
- Click Login in the upper right corner.
- Enter your UCInetID and password in the Web Authorization screen
- Click Login.
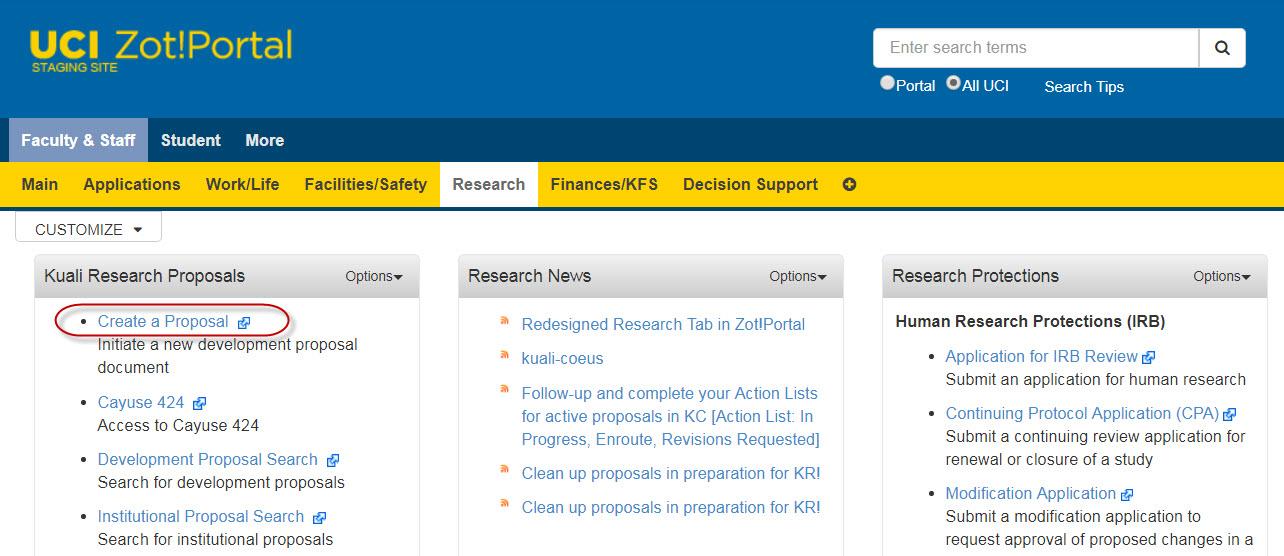
- Navigate to Faculty & Staff > Research > Kuali Research Proposals.
- Click Create a Proposal.
- If the Research Tab is not available to you, please contact the ERA Team.
If you receive an error message in the KR system that you are not authorized to initiate Proposal Development Document, or you do not have access to create a proposal for your Lead Unit, contact your Department DSA to grant access to the Proposal Creator and/or Administrative Contact roles in KSAMS. If you need help determining who your Department DSA is, please contact the ERA Team.
- Proposal Creator KSAMS role will allow you to initiate, view, edit, and submit proposals for a lead unit.
- Administrative Contact KSAMS role will allow you to view, edit, and submit proposals for a lead unit.
To grant access to a specific proposal (but not globally for a lead unit), refer to Access instructions in the Creating a Proposal section.

Starting a Proposal
Upon clicking Create a Proposal, you will be taken to a new page that collects information that is required to start a proposal document. Having all the required fields completed allows the Proposal Development record to be saved and recorded in the KR system. In the ‘Create Proposal’ process, when the initial required fields for saving fields are completed and the user clicks ‘save and complete,’ the Proposal Details screen appears.

Jump to the Creating a Proposal section in this user guide to continue completing the Proposal Development Document. Or, continue to the Navigating a KR Proposal section for more information about the KR Proposal interface and description of reference information, action links and buttons.
Navigating a KR Proposal
Header
The document header on the top displays six fields of reference information about the Proposal document.

| Left - Proposal Info | Description |
|---|---|
| Proposal number | Number incrementally assigned by the system |
| Principal Investigator (PI) | Not yet assigned displays until a PI is added on the Key Personnel screen, then the person’s name is displayed. |
| Right – Document Info | Description |
| Doc Number | Numberincrementally assigned by the system |
| S2S Connected | Status indicated by a gray ‘no’ box until a successful S2S Opportunity is applied and is updated to a green ‘yes’ box. *Note: UCI is not currently utilizing Kuali S2S. |
| Status | Submission state of the proposal (In Progress, Enroute, Approved, Submitted, etc.) |
| ‘more’ | Click to display information expanded from the ‘doc info’ data including the create and last update timestamps as well as the sponsor name. |
Proposal Toolbar
The Proposal Toolbar provides access to Proposal Actions.

| Horizontal Band Toolbar | Description |
|---|---|
When (off): click to open the Data Validation options window and turn validations (On) When (on); click to turn off the validations, to view the list of existing validations, their location, description, severity (warning or error), and the ‘fix’ button to navigate directly to the validation location |
|
| Click to open the available print options: Sponsor Form Packages; or the Reports (Current Support, and Pending Support) | |
| Copy | Click to open the Copy Proposal window |
| Medusa | Click to view the relationship this proposal has to other KC documents |
| Hiearchy | Click to open the Proposal Hierarchy builder window. Use this tool to link the current proposal to an existing hierarchy, or to create a new hierarchy. (See section on Hierarchy) |
| Budget Versions | Click to open a Budget Version window to add a new budget version, open an existing budget, or use one of the Action options (View Summary, Copy (budget), Print (reports), or Submit (mark the version as the final/complete to submit with this proposal) |
| Link | Click to obtain a direct link to the Proposal you are currently in |
| Help | When the Help link is clicked it will expand a dropdown that has selections of different areas in the proposal. Upon clicking one of the options it will open a new browser window linked to either a Kuali Research article (default) or a custom linked site configured via the below listed parameters |
Creating a Proposal
Basics
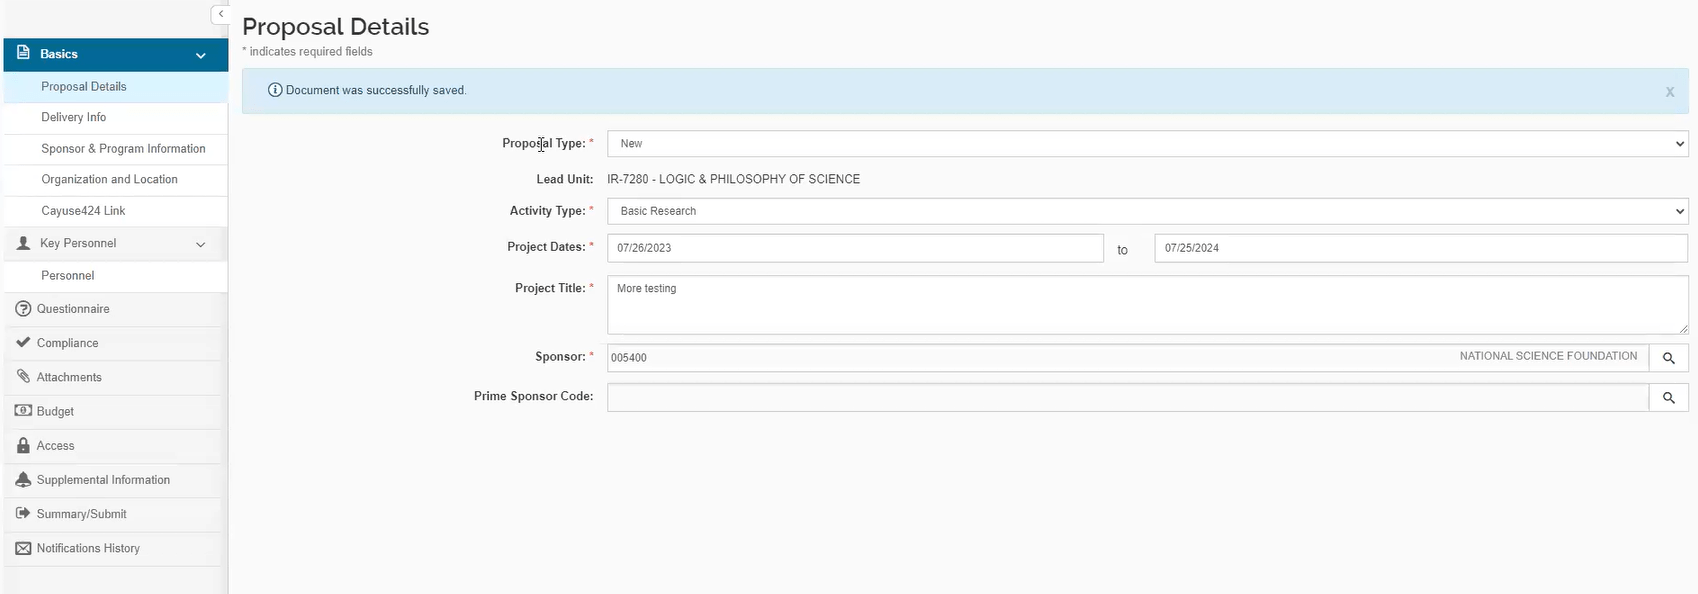
Proposal Details
Proposal Details is the first screen in the Basics menu navigation of the proposal. In the ‘Create Proposal’ process, when the initial ‘required fields for saving’ fields are completed and the user clicks ‘save and complete,’ the Proposal Details screen appears. When opening existing proposals, the Proposal Details screen is the opening screen.
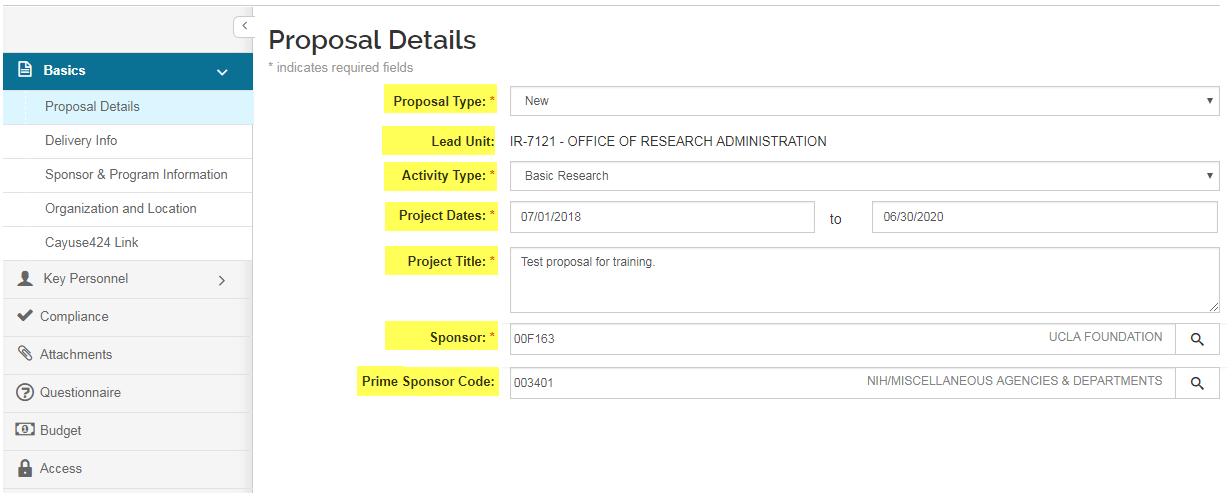
Required fields for saving (those marked with an asterisk *) may be edited once the proposal has been saved. To edit or enter into the field you have the following field types:
- Drop-Down: scroll through the options and highlight your selection
- Date: click in the field to activate the calendar tool (either use the tool or manually enter date)
- Text: click in the field and edit the existing text
- Lookup: click in the field and use the lookup tool to locate the item
The proposal will remain editable while saved but once submitted into routing for approval it will be locked down. If the proposal is returned to the initiator for edit during the workflow review, it will become editable again.
- Proposal type - Used to identify the type of proposal (e.g. New, Resubmission, Revision, etc.).
- Lead Unit - The unit/department assigned to a proposal. (Proposal Creator Access is managed in KSAMS. Refer to the Logging In section for instructions on obtaining Proposal Creator and/or Admin Contact role access in KSAMS.)
- Activity Type - The university functional area for this proposal (e.g. Basic Research, Applied Research, Instruction, Student Service, Fellowship, etc.).
- Project Dates - Beginning and end of the entire project period.
- Project Title - Proposal project title.
- Sponsor - A unique identifier for the sponsoring organization for the project. Kuali will display the Sponsor Name to the right of the Sponsor Code. You can either begin typing in the name of the sponsor, or use the magnifying glass lookup tool to search for the sponsor.
*Can't find or need to request a new sponsor code? Please contact the ERA Team for assistance.
- Prime Sponsor Code - A unique identifier for the prime sponsoring organization, which is the original funding source for the project. Kuali will display the Prime Sponsor Name to the right of the Prime Sponsor Code. Complete this field if you will not submit this proposal directly to the funding agency, but to a collaborator for inclusion in their application to the funding agency. (e.g. you are submitting as a subawardee).
Delivery Info
The Delivery Info screen is optional and can be used to provide information to SPA. This screen is relevant for submissions that need cover letters signed by the authorized official, and proposals that will be submitted directly to the sponsor by the PI.
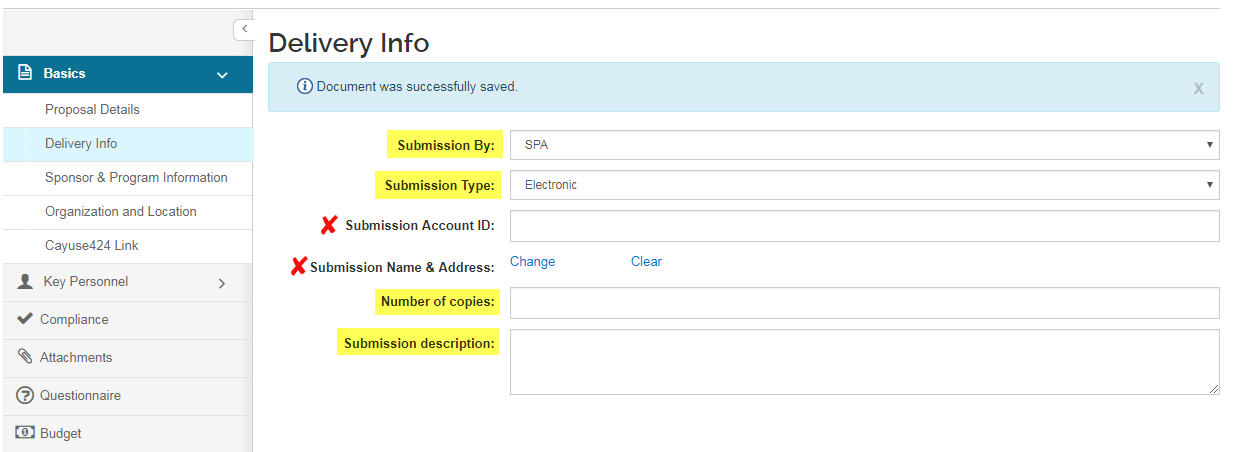
- Submission By: Select an option to describe which party is responsible for submitting the authorized proposal to the sponsor
- Submission Type: Select an option to describe in how the proposal will be transmitted
- Submission Account ID: Leave blank.
- Submission Name & Address: Not required.
- Number of Copies: if applicable, enter a numeric value for the number of proposal hardcopies that must be provided or submitted.
- Submission Description: use this field to provide information and details about the submission.
Sponsor and Program Information
This screen is used to provide submission information regarding the proposal.
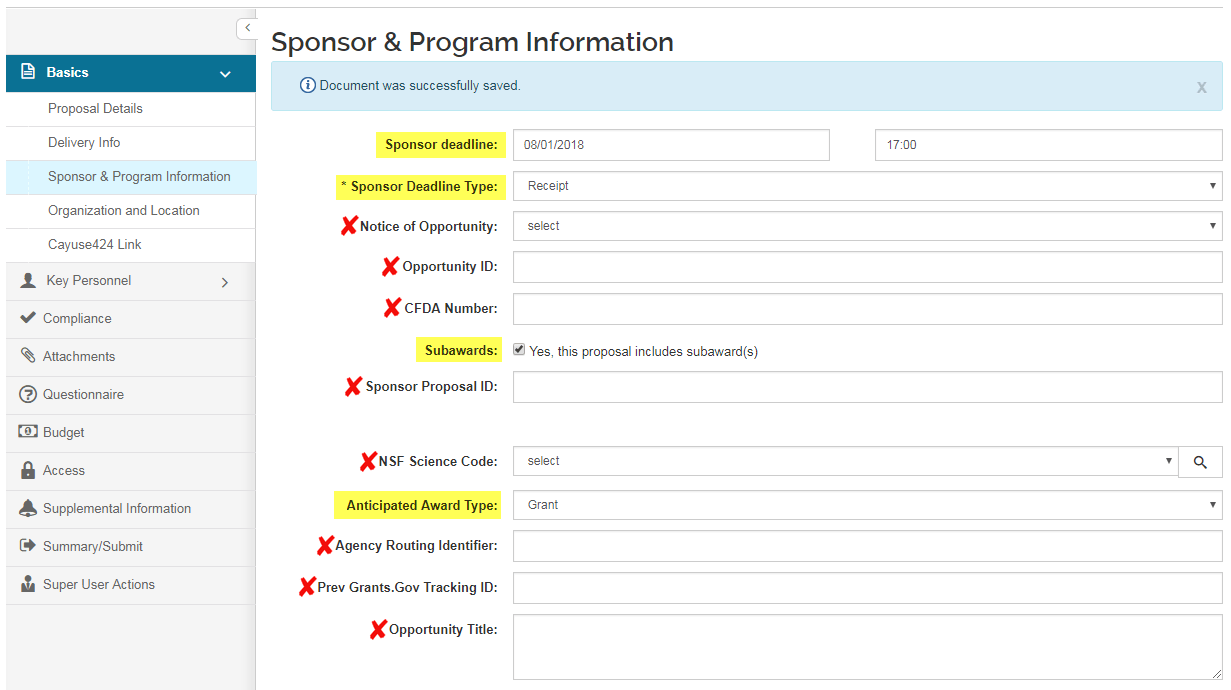
- Sponsor Deadline (date) - Click in the field to open the calendar tool to select the date, or type in mm/dd/yyyy format to populate the box with the date the proposal is due to the sponsoring agency
- Sponsor Deadline (time) - Optional. Click in the field to enter the time of day that the proposal is due at the sponsoring agency in ‘hh:mm’ format using military time format e.g. for 5:00PM, enter 17:00
- Sponsor Deadline Type - Click in the field to view the available options: scroll to select one. (Postmark, Receipt, Target)
- Notice of Opportunity - Leave blank.
- Opportunity ID - Leave blank.
- CFDA Number - Leave blank.
- Subawards - Check the box to indicate whether the proposal includes subawards to other institution/entities.
- Please see the Subawards section in the Additional Information section below for instructions on how to include subaward information in your proposal document.
- Sponsor Proposal ID - Leave blank.
- NSF Science Code - Leave blank.
- Anticipated Award Type - Click within the field to display the list, and then click on an item in the list to highlight and select it to make your selection.
- Opportunity Title - Leave blank.
Organization and Location
Information regarding the Performance Site location is no longer required. Information regarding whether the project will be conducted On-Campus or Off-Campus will now be included on the Supplemental Information section.
Cayuse 424 Link
For grant applications to Federal sponsors utilizing Cayuse 424, paste the link to the Cayuse proposal here. When the proposal is final and ready for submission, check the box to indicate the that it is final.
To sync information from Cayuse to KR (e.g.: project title & dates, personnel), click on the "Pair and Sync" button. Confirm that you would like to sync these data elements. The draft timestamp and most recent sync timestamp will appear.

Key Personnel
This screen is used to add Principal Investigators (PI), any additional Multiple-PI’s (MPI) and Key Persons (proposal role description required) to the proposal.
*Use the Investigator role for all individuals who meet the COI definition of an Investigator for PHS/DOE/NSF proposals and are not considered a Key Person.

The Add Personnel button will open the lookup where you can search/return an individual, define their role, and then add to the proposal.
Click Add Personnel to open the person search window.
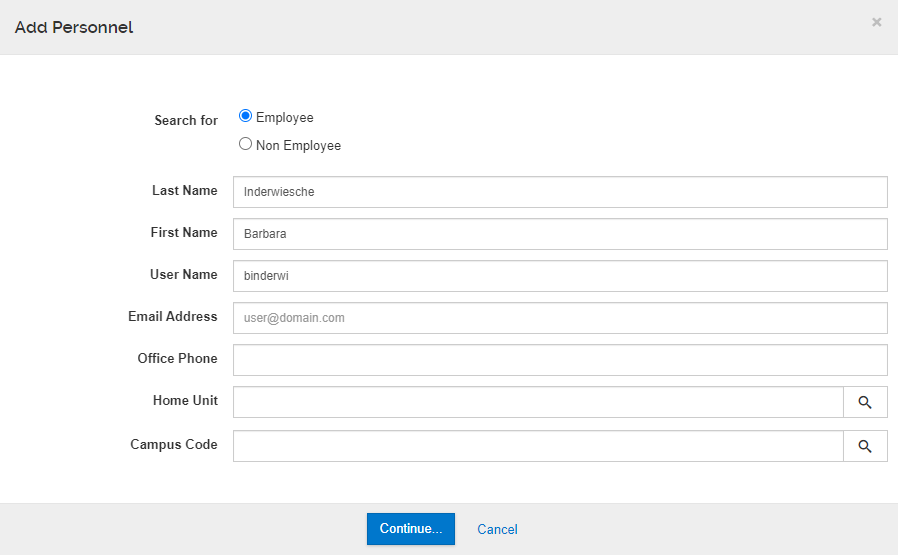
Click Add Personnel to open the person search window.
- Ensure "Employee" is selected - it should be the default selection.
- Enter search criteria to find the person you are looking for; use several fields in the lookup to limit the search results. User Name is their UCI Net ID.
- Click Continue to proceed with the search.

4. Review search results and click the radio button at the row you want to select; click Continue.
- Or click ‘Go Back’ to perform another search.
- Or click the ‘x’ button in the upper right of the window to exit and close the search.

5. With a selected person, Assign a role by clicking a radio button beside one of the selections: Principal Investigator or PI/Contact, PI/Multiple, Co-PI, Key Person or Investigator
- Principal Investigator is selected by default for the initial search, and any subsequent search until that role is assigned.
- PI/Multiple will only appear if the proposal is a PHS/NIH sponsor.
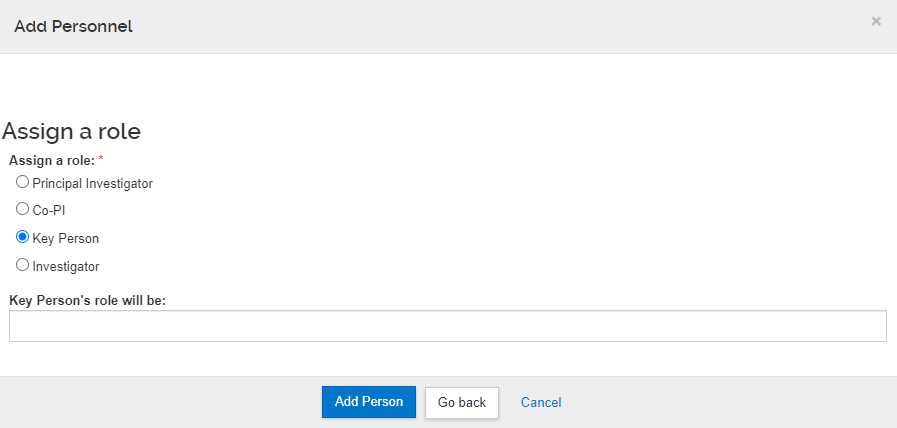
- When Key Person is selected, the Key Person Role field will appear and must be completed.
- Proposal Roles can be reassigned in the Details tab after proposal persons are added.
6. Click the Add Person button to complete this task or click ‘Go back’ to open the previous search results window.
Federal Sponsors or Federal Prime Sponsors Certification Requirement
For more information on the Federal Funding Proposal Review, read through the Research Security & Integrity Compliance website: https://research.uci.edu/rsie/fedprop-review/
When either a federal sponsor or federal prime sponsor is selected, it will now be required that all key personnel must fill out the certification questions prior to the proposal being routed to workflow. Delays in personnel certification could cause delays in proposal submission.
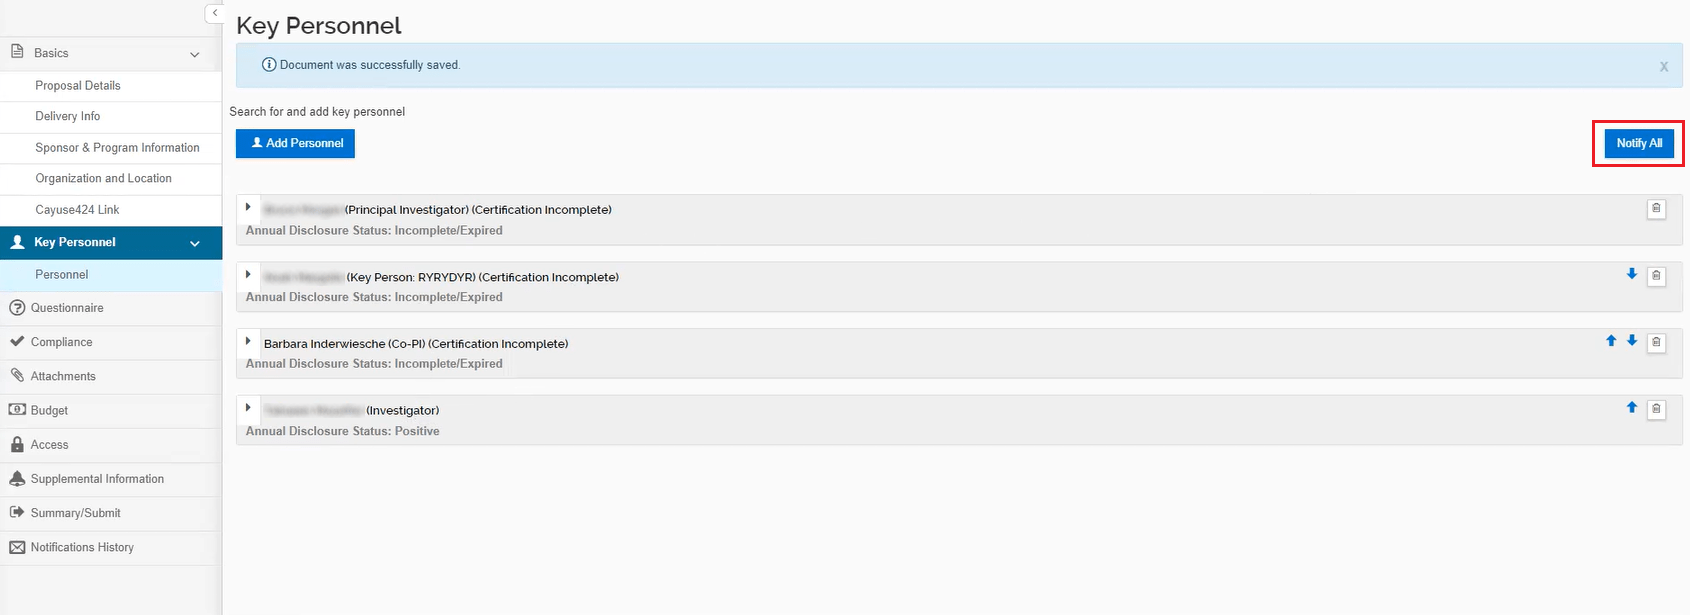
Once all key personnel have been added, select the “Notify All” button to send a specialized notification to the Key Personnel. You can select all personnel to send the notification and you can come back to this page as often as needed to send additional notifications.
Only those assigned to the key personnel role will be required to complete the certification questions. Individuals assigned the Investigator role will not have to answer these questions.
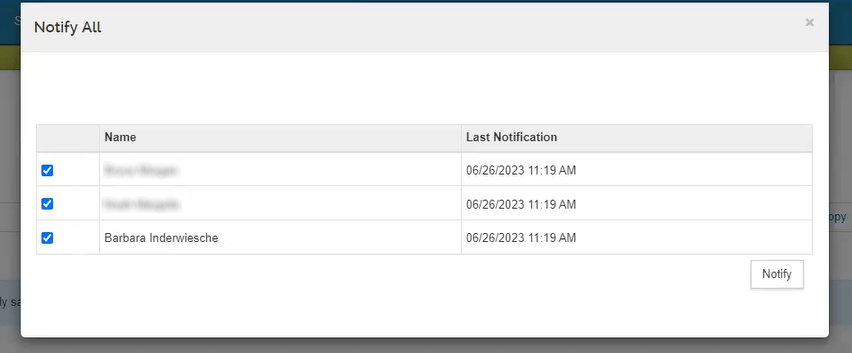
IMPORTANT: Nobody can certify on the key person’s behalf. There are no proxies and no ERA Superuser capabilities. The person that was added on the personnel tab in KR PD, must log in and answer the certification questions.

Each key person must use the link in the notification email that will direct them to the certification questions.
Note: The initiator receives a copy of the notification email as well. This is so that they can also have a link and forward it to the personnel if needed.
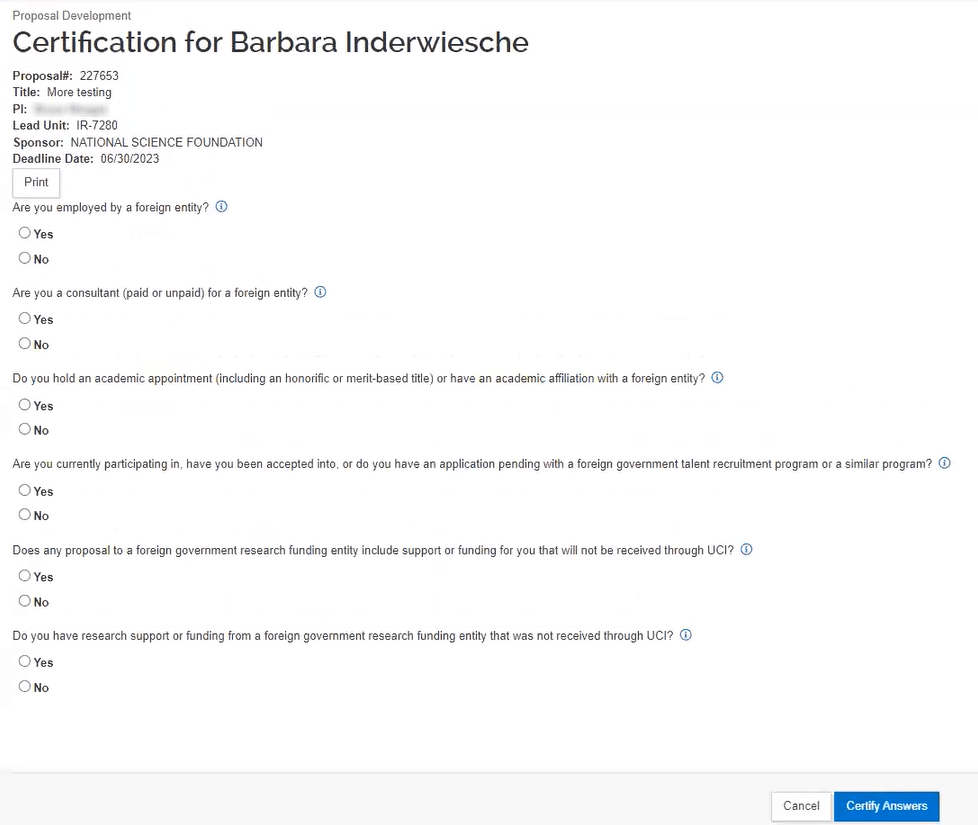
Once the key person follows the link in the notification email, they will log in and be presented with the questions that need to be answered.
It is okay if the key personnel are answering the questions while the proposal development document is still being worked on. Answering the certification questions will not cause any document locks. It is recommended for the Key Personnel to answer the questions as soon as they are added to the proposal so that it is completed and out of the way.


The certification for all Key Personnel must be completed prior to the Initiator submitting the proposal into workflow. If the certification is not completed, the data validations will prevent the proposal from submission into workflow.

Once all Key Personnel have completed their certification, a notification will be sent to the Initiator.
Compliance
The Compliance screen is used to provide relevant research compliance-related information to SPA.
To add Compliance items, click on "Add Compliance Entry" and a pop-up will launch:
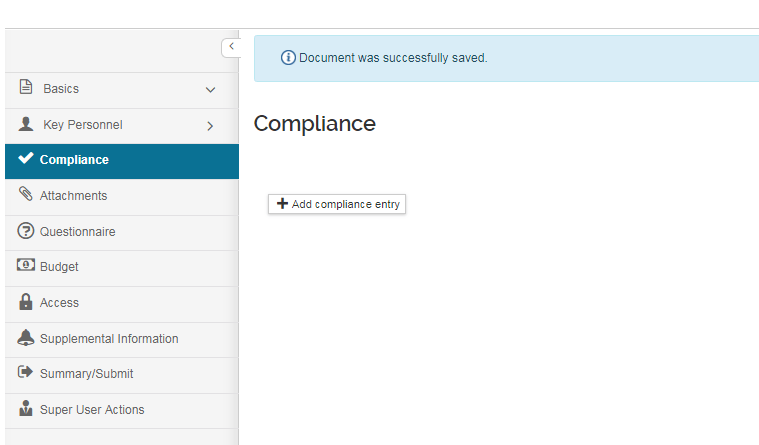
On the "Add Compliance Entry" popup screen, multiple special reviews of the same type can be added if appropriate for the application. Below outlines how to add/remove a Compliance entry and the field options that become available:
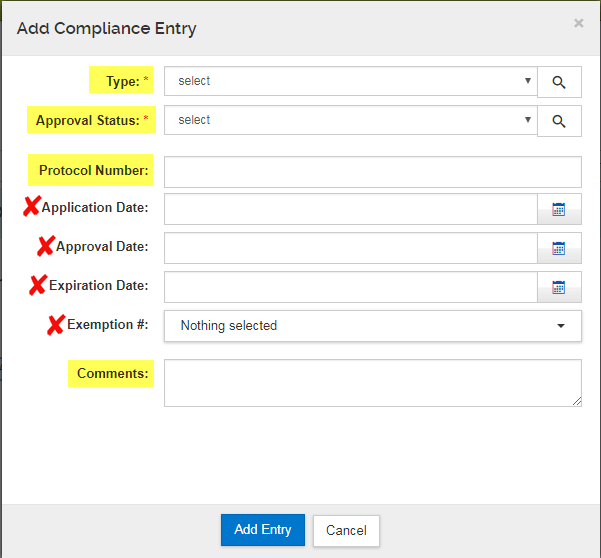
- Type: Select the compliance item you will include. Do not use any of the type denoted for SPA ONLY.
- HSCRO
- IACUC
- IBC
- IRB
- Outgoing Subaward
- Other
- Approval Status: select as applicable.
- Approved
- Pending
- Approval Not Required (do not use - for SPA use only)
- Incomplete (do not use - for SPA use only)
- Protocol Number
- Enter the protocol number if available.
- Use this field to name the Subaward Entity if you selected "Outgoing Subaward" (20 character limit)
- Please see the Subawards section in the Additional Information section below for instructions on how to include subaward information in your proposal document.
- Application Date: Leave blank.
- Approval date: Leave blank.
- Expiration Date: Leave blank.
- Exemption Number: Leave blank.
- Comments: Provide additional comments, if necessary.
Attachments
Proposal
Attach a copy of the proposal file for review. Set the "Status" for the attachment is "Complete."
*Note: If a Proposal Cover Letter or Signed Commitment Form is needed from SPA, please upload a placeholder using Attachment Type: "Proposal Cover Letter" so that SPA can replace it with a signed letter/form upon review. SPA does NOT have the ability to upload additional attachments in the Proposal Attachments section but can replace existing documents.
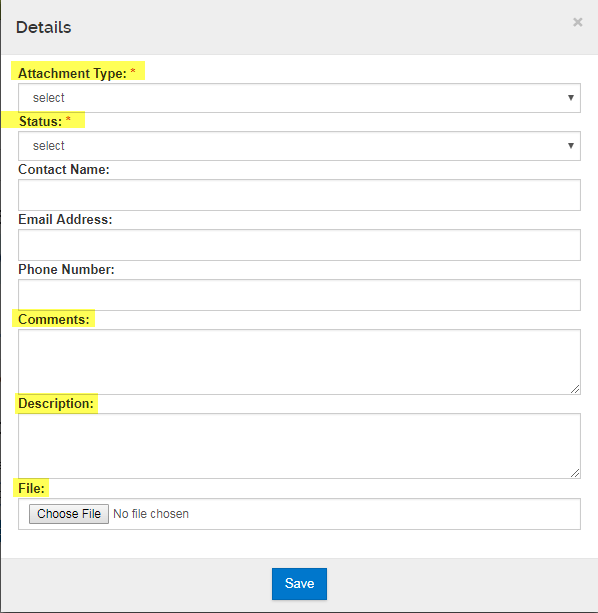

- Attachment Type: Select the attachment type applicable
- Grants.gov Package - DRAFT Scope of Work
- Grants.gov Package - FINAL Scope of Work
- Proposal Package complete per RFA - DRAFT Scope of Work
- Proposal Package complete per RFA - FINAL Scope of Work
- Proposal Cover Letter
- Budget
- MCA/Subrecipient Commitment form
- Other proposal attachment
- Status: Always set as "Complete"
- Contact name: Not required, leave blank.
- Email Address: Not required, leave blank.
- Phone Number: Not required, leave blank.
- Comments: Provide comments, if necessary.
- Description: Provide description of attachment (optional)
Personnel
Not required; Leave blank.
Abstracts
Not required; Leave blank.
Internal
Attach any documents that are not part of the proposal file to be submitted to the sponsor here. This may include internal budgets, COI forms, copy of Sponsor Guidelines, etc.
*Note: upon SPA's institutional review, if the KR proposal is returned to initiator for edits and SPA attaches a Proposal Return Attachment, it will appear here, in the Internal Attachments section.
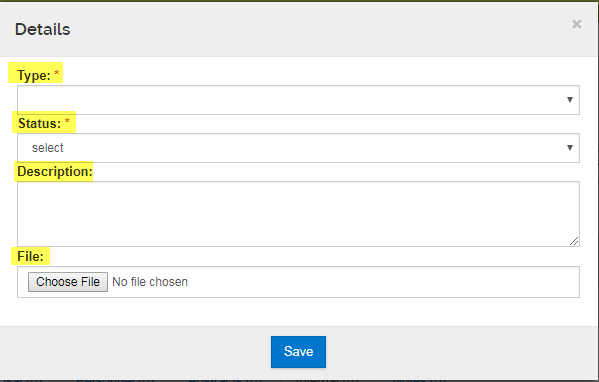
- Type: Select the attachment type applicable
- California 700U
- Indirect Cost Exception Request
- Form 800SR for Non-UCI Investigators
- Form 900SR for Non-UCI Investigators
- Subrecipient Proposal Package
- PI Clinical Trial Questionnaire
- Sponsor Guidelines
- Draft Agreement
- Third Party Cost Share Commitment Letters
- Off-Campus Rate Request
- Clinical Trial Protocol
- VCR Cost Share Commitment Letter
- Other Internal Attachment
- Status: Always set as "Complete"
- Description: Provide description of attachment (optional)
Notes
You may add notes regarding the proposal and or attachments to this section, if necessary.
Please be aware that notes CANNOT be deleted.
Click the "+ Add Note" button to add a note. Enter a note topic and note text.

After the note has been added, it will appear as shown in the screenshot below.

Questionnaire
There are four categories of questions: General Questionnaire, Clinical Trial, Compliance & EH&S (Environmental Heath & Safety). All questionnaires must be completed.
Some questions are required for all proposals, and other questions will become conditionally required if answered "yes".

Budget
Only a Summary Budget is only required. Do not complete a Detailed Budget. Do not select Modular Budget option.
For NIH proposals, you will be presented with the option to select a Modular Budget; do not select Modular Budget, even if you are assembling a Modular Budget in Grants.gov or Cayuse.
To add a budget, first click "Add Budget":

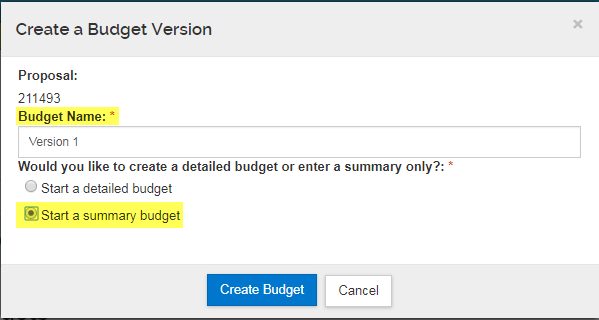
Then provide a Budget Name, select "Start a Summary Budget" (do not select 'Start a detailed budget') and then Click "Create Budget":
On the Periods & Totals tab, you only need to enter dollar amounts in the Direct Cost and F&A Cost columns.
The F&A Rate and Rate Type are not entered here, but will be entered on the Supplemental Information tab instead.
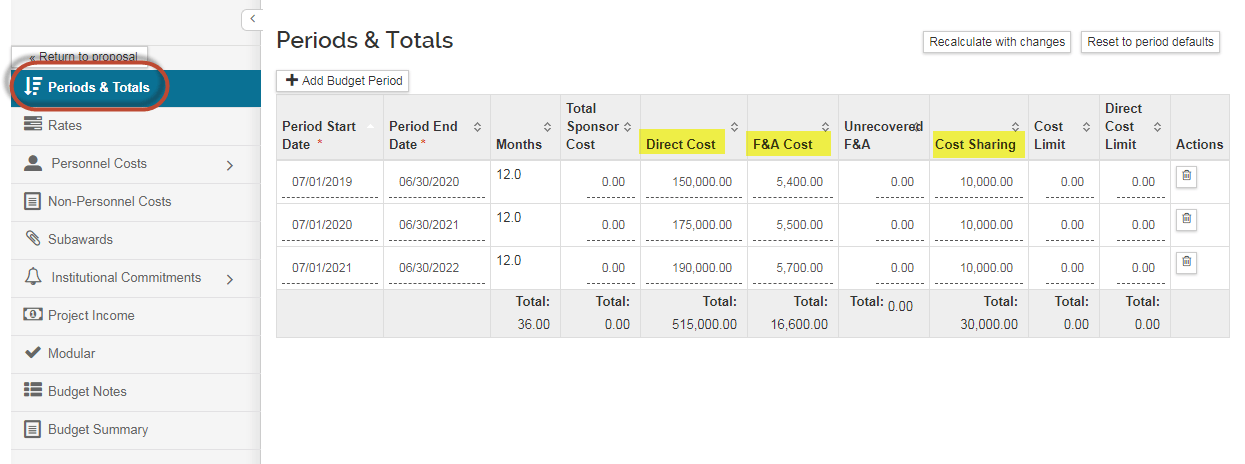
If there is Mandatory Committed Cost Share, include that amount in the Cost Sharing column. If a value is entered here, you will need to complete the Institutional Commitments > Cost Sharing Section:
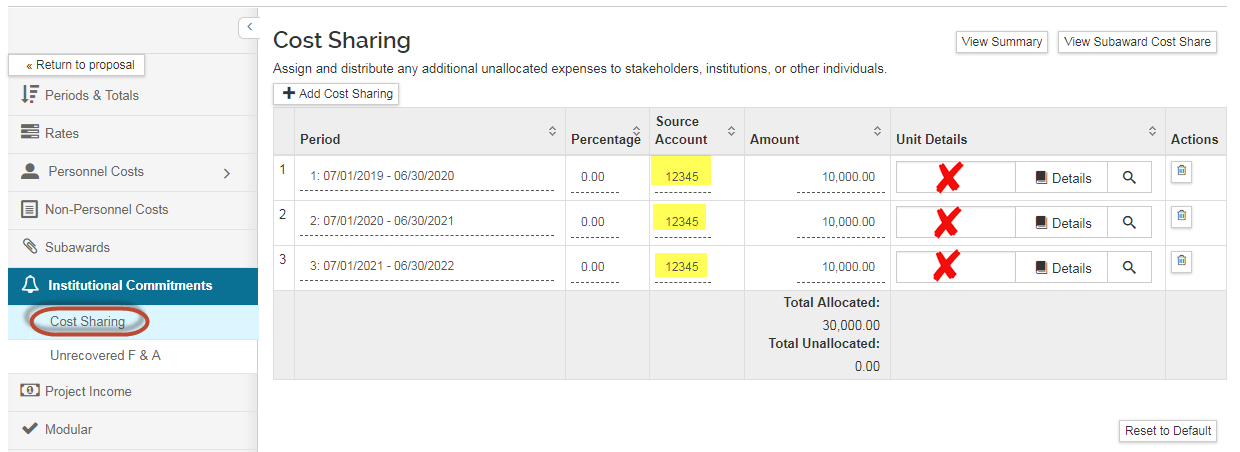
- Period: Based on what is entered on the summary page.
- Percentage: Leave as is.
- Source Account: this field is required in order to save; but we are currently not utilizing the field. Enter "12345" as a placeholder.
- Amount: Based on what is entered on the summary page
- Unit Details: Leave blank.
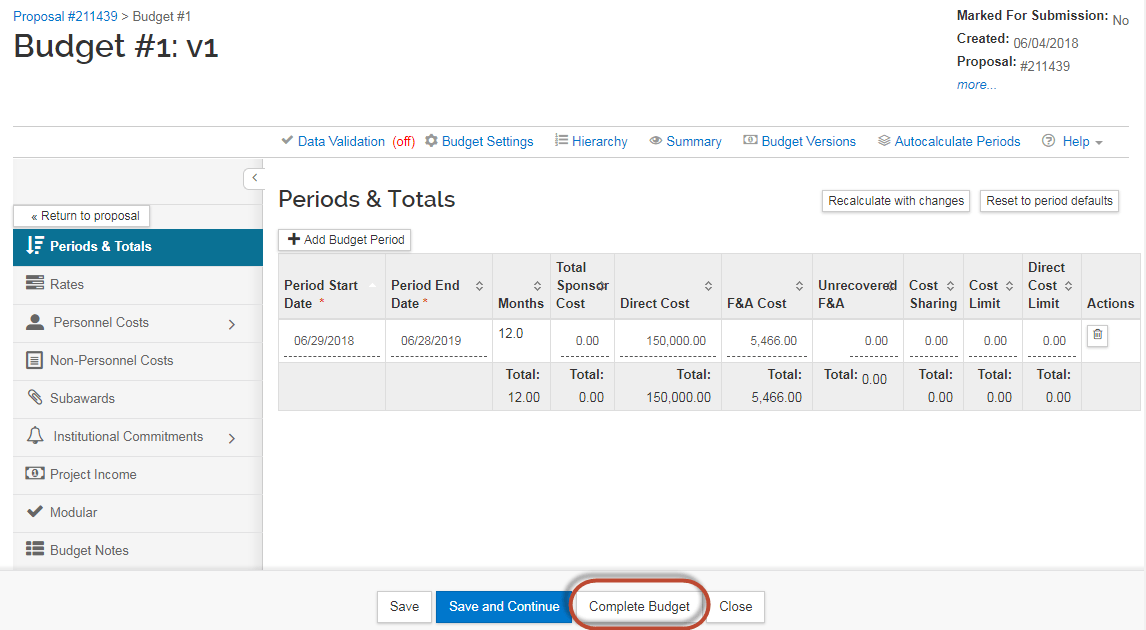
Once the budget amounts have been entered, Click "Complete Budget":
Next, select the checkbox that indicates the budget is ready to be submitted to the sponsor . Then click "OK."

You can now click "Return to Proposal."
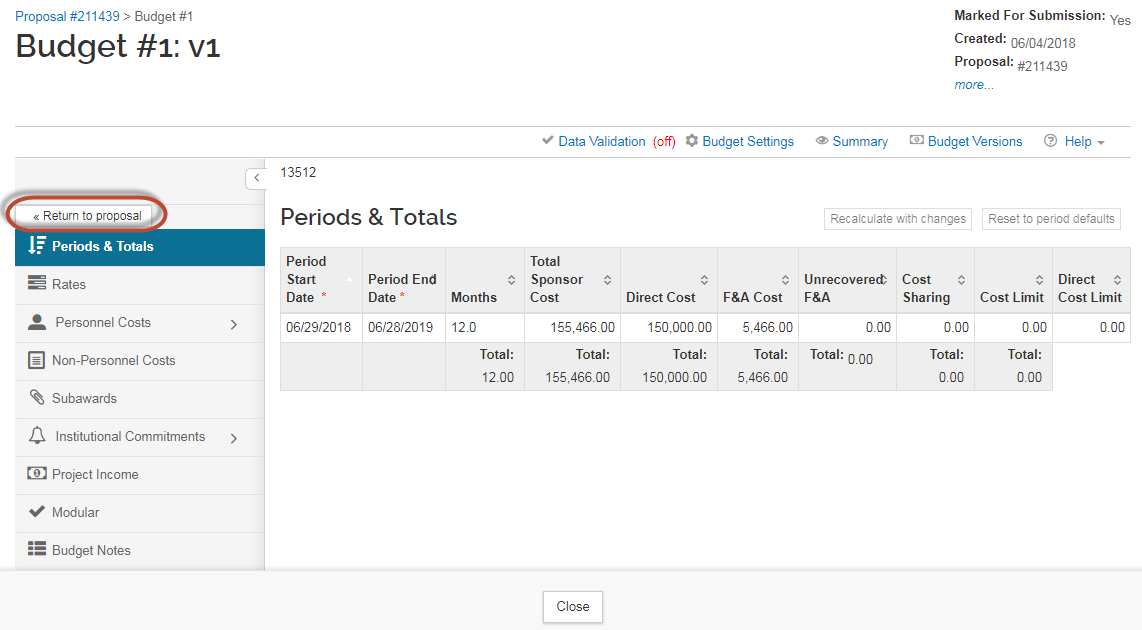
All other sections of the budget (Personnel Costs, Non-Personnel Costs, Subawards...) are NOT required and should be left empty.

Note: If your proposal includes Subawards, do not include the subaward budget attachments here. They should all be included in the Subrecipient Proposal Package to be attached on the Internal Attachments section of the Attachments page. Please see the Subawards section in the Additional Information section below for instructions on how to include subaward information in your proposal document.
Access
You can grant access to this proposal to other users if necessary. However, to obtain global access to proposals for your department, refer to the Logging In section for instructions on obtaining Proposal Creator and/or Admin Contact role access in KSAMS.

Supplemental Information
This section contains additional fields that have to be completed.
- Sponsor Contact Information: in cases where a cover letter must be provided by SPA, enter the Sponsor Contact info so that your SPA officer knows who to address the letter to
- On/Off Campus: Indicate where the majority of the proposed project will take place. This will help in determining whether the correct F&A Rate is being applied.
- F&A Rate: Provide the F&A Rate included in the proposal budget. This field is for numbers only. Do not include the % sign or any alpha characters.
- F&A Rate Type: Provide the F&A Rate Type included in the proposal budget.

Summary/Submit
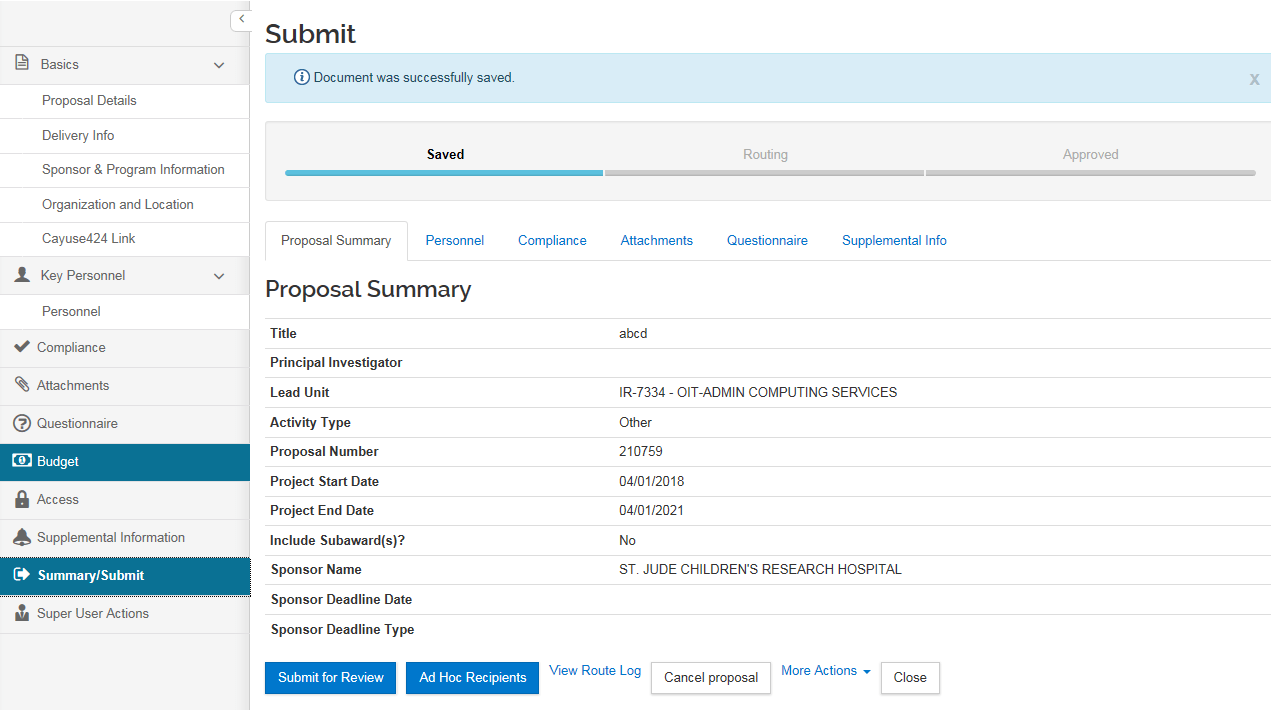
The Summary/Submit screen provides a series of tabs with information across the entire proposal so a user can better review the proposal from this single tab. Proposal preparers can review the summary for completion prior to submitting into workflow.
Additional Information
(Proposals with Subawards, Link Feature, Summary/Submit, Approver Actions)
Proposals with Subawards
For proposals that include subawards, follow the instructions below:
- Basics tab > Sponsor & Program Information:
- Check the Subawards checkbox (Yes, this proposal includes subaward(s))
- Attachments tab:
- Attach all Subrecipient package documents to the Internal Attachments page
- Compliance tab:
- Add a compliance entry by selecting "Outgoing Subaward" as the compliance type
- Enter the subaward entity name on the Protocol Number field
- If the subaward site is following UCI's COI policy, add "-COI" to the entity name in the Protocol Number field
- DO NOT enter any Subaward information or attachments on the Budget forms
Link Feature
In the top toolbar, there is a "Link" button that you can click. This is similar to the "Share Proposal" button on the Personnel tab in the old KC system. You can use this button to generate a direct link to this proposal in KR which you can share with your colleagues or PI if they are unable to access or find the proposal in the system.

Summary/Submit Actions
The available action buttons along the bottom change depending on the route status of a proposal (i.e. In Progress, Enroute, Final, etc.). Below outlines the action button options at the various stages. Please note that some of these buttons will only be available to users with the appropriate permissions.
Prior to Submitting for Review:
- Submit for Review: Submits the proposal into workflow for review and approval. All validations will be processed prior to routing. Proposals may be submitted with warnings; click the button in the validation window to “submit with warnings” or close the validation window to address the warnings. Errors, however, must be fixed prior to submission into workflow.
- Ad Hoc Recipients: Allows a user to create custom routing insertions on the proposal - more information on this functionality below.
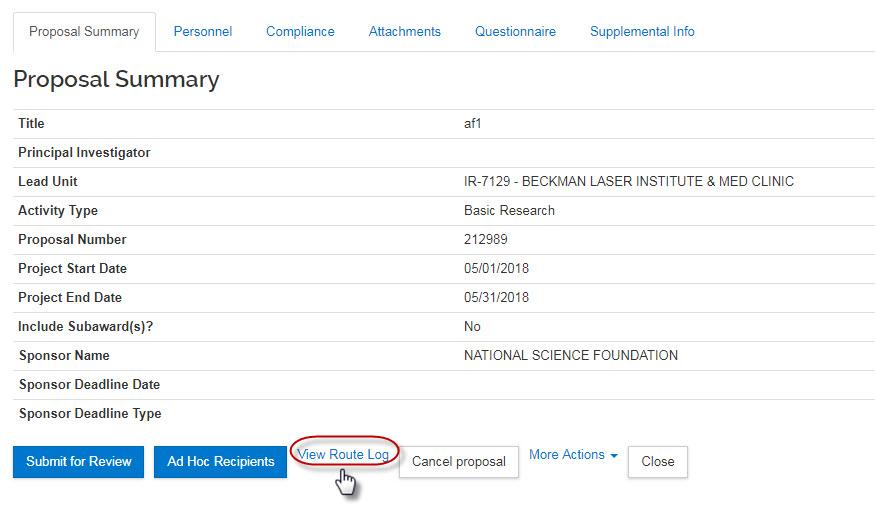
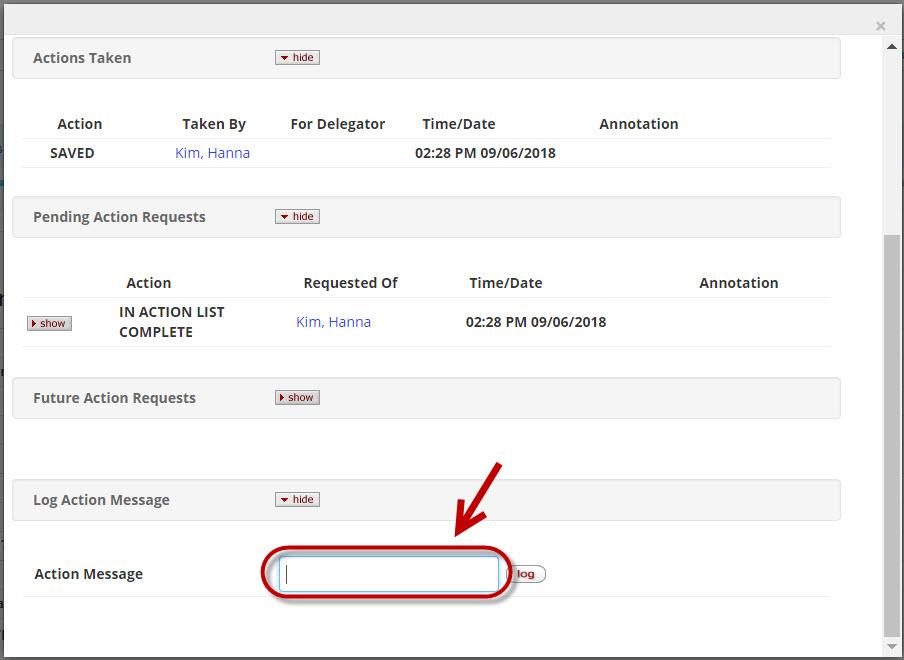
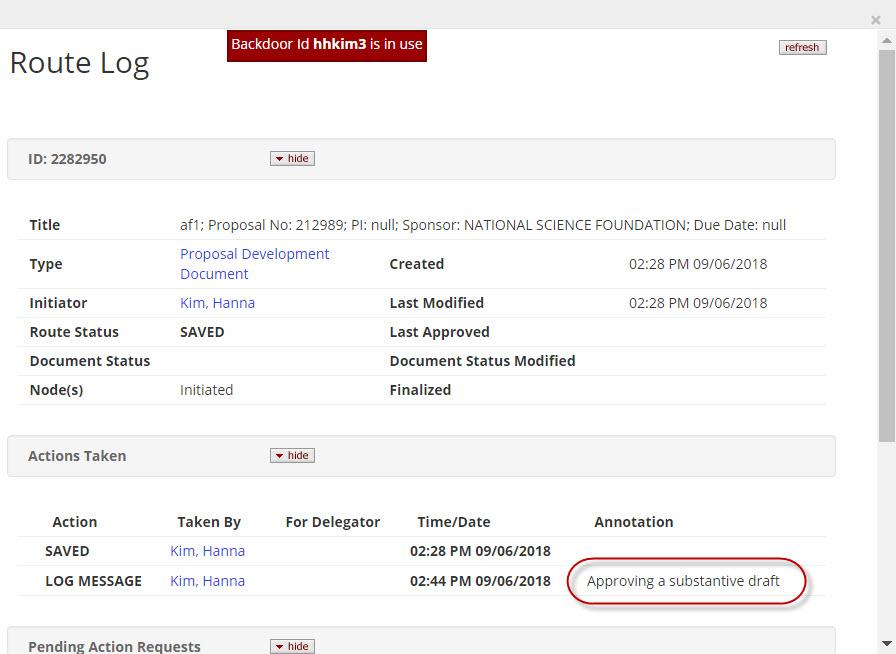
- View Route Log: Users with access to the proposal can click the View Route Log link to view the routing progress, view which approvers have already approved and approvals are still pending.
- Cancel Proposal: Click this button to cancel the proposal document - once canceled the proposal can't be routed or edited but can still be copied.
- More Actions:
- -> Send Notifications: Currently not used.
- -> Reload Proposal: Will reload the proposal from the last save - any changes since will not be saved.
- Close: Click this button to exit the proposal document. Click OK in the confirmation to save any recent changes.
After Submitting for Review:
- Send Adhoc: Will send proposal to the added Ad Hoc Recipients and insert them in the workflow - more information on this functionality below.
- Ad Hoc Recipients: Allows a user to create custom routing insertions on the proposal - more information on this functionality below.
- View Route Log: Users with access to the proposal can click the View Route Log link to view the routing progress, view which approvers have already approved and approvals are still pending.
- Recall: Allows an aggregator to pull back the proposal from workflow and return it to the their action list for edit. When the Recall button is clicked the user must enter a reason for the recall in the confirmation window and then click “ok” to complete the action. Otherwise, click ‘cancel.’
- If any approvals have already been completed, they will need to be obtained again.
- More Actions:
- -> Send Notifications: Currently not used.
- Close: Click this button to exit the proposal document. Click OK in the confirmation to save any recent changes.
Reviewer/Approver Actions
Approvers will see documents requiring their attention in their Action List (button in top right hand corner). Also, the user should receive an email notification depending on your institutional configurations. Once in a document the approver may click through the tabs in the Submit screen to view the summarized information in the proposal without having to leave this screen, however, they also can navigate to each tab of the proposal if they choose. The following are the approver options when a document is routed:
- Send Adhoc: Will send proposal to the added Ad Hoc Recipients and insert them in the workflow - more information on this functionality below.
- Ad Hoc Recipients: Allows a user to create custom routing insertions on the proposal - more information on this functionality below.
- Approve: This signifies your approval of the proposal and allows it to continue along the workflow path. You may receive a message asking if you wish to receive future approval requests if you also appear in a future workflow stop - clicking yes will require you to approve again at the future stop, whereas, clicking no will automatically approve on your behalf at the future stop.
- Return: If the proposal needs corrections, you can return the proposal back to the initiator and include comments.
- View Route Log: Users with access to the proposal can click the View Route Log link to view the routing progress, view which approvers have already approved and approvals are still pending.
- More Actions:
- -> Send Notifications: Currently not used.
- Close: Click this button to exit the proposal document. Click OK in the confirmation to save any recent changes.
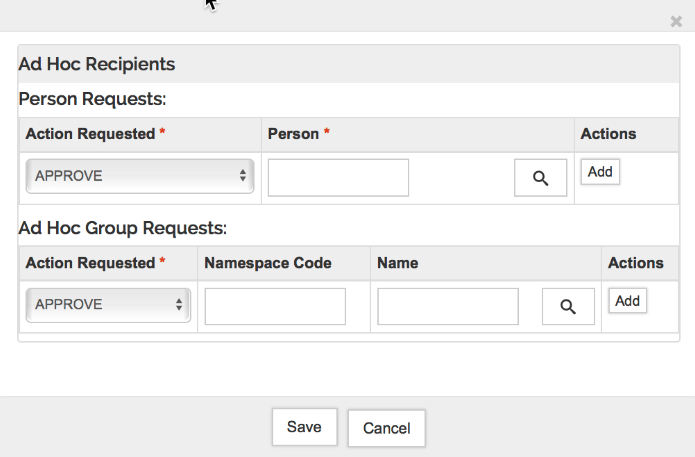
Ad Hoc Recipients
Use this tool to generate custom routing requirements for the proposal. The following types of route stops can be added for an individual person, or to a group:
- FYI - FYIs do not interrupt the normal workflow routing of a document but give a user view access and allows them to signify they've taken action. A document with no pending approval requests but with pending FYI requests is in Final status. The difference between Acknowledgement and FYI is that FYI requests can be cleared directly from the action list without opening the document. FYI requests also have a different effect on the document status than Acknowledgements.
- Acknowledge - Acknowledgements do not interrupt the normal Workflow routing of a document. They do not stop a document from routing on to other individuals or workgroups who need to take approval actions. It allows you to make a user aware of a given proposal and have access to view. However, a document with no pending approval requests but with pending Acknowledge requests is in Processed status.
- Approve - This type of stop will require the user take the approval action prior to it moving forward in workflow. Approval must be done by the individual/group assigned before it can complete or proceed in routing.
- Complete - Only available prior to submitting proposal for review (proposal status is In Progress). This allows a user to ad-hoc route a pending proposal in an editable state to another user to complete the proposal and submit into routing. Be aware, when a user has it in their Action List to complete it's editable but the only option is to submit the proposal for review but it cannot be returned to the initiator.
To Create an Ad Hoc Requirement click the Ad Hoc Recipients button to open a new window where you can select the desired Action Request in the Person or Group request section. Use the magnifying glass icon to search for the individual or group you want to ad-hoc route for action. Repeat the steps if more users should be included, otherwise click the Save button to close the window. To actually send the ad-hoc requests and insert them in the route log you'll need to click the 'Send Ad-hoc Requests' button on the bottom of the proposal.
When the notification content is complete and all desired recipients have been added click the 'Send Notifications' button to complete the process. If you wish to send another email you can at any time on a proposal while it's in progress or enroute.

